1 · Your first sampler program
- Open buttholechopper. DIGGER opens first.
- Find an audio file in DIGGER. Highlight it to load its preview. Use Play or enable Autoplay highlighted audio.
- Drag across the waveform to select your break. Adjust the two handles while listening with Loop enabled. Click Truncate to send that selection to the working waveform. To use the whole file, click Load selected audio for analysis.
- Optionally adjust tempo in STRETCHER. Enter the beat count for the entire loaded break, choose a FLUID mode, and edit CURRENT BPM. For a two-bar 4/4 break, enter 8 beats.
- Choose cuts in CHOPPER. Interval divides the full waveform into equal parts; Transient uses TRANSWRITE to find attacks. Listen to the slices and move or add cuts as needed.
- Open MAPPER and click AUTOMAP. This replaces the program with up to 64 active chops in timeline order, starting at A01. Alternatively, drag individual chops onto pads.
- Audition and rename the pads. Click a pad number to play it. Click its sample name to edit it. Adjust tuning, envelopes, filtering, and mixer settings as needed.
- Choose a target with the arrow beside export. Use MPC2000XL / WAV or MPC2000 Classic / SND for the corresponding machine. Select a Backwards compatible target for stock firmware when using Vu mute groups.
- Click export and choose a program filename. Keep the resulting PGM and all its samples together. Save the sequence separately if you have made one.
Save before closing. There is no complete application project file or automatic session restore. Export your program and samples, sequence, processed audio, and synth preset separately. Save/export requires valid trial or activated access; editing and listening remain available without it.
2 · Workspaces and shared controls
| Workspace | Use it for |
|---|---|
| DIGGER | Browsing and auditioning files; selecting, rotating, normalizing, reversing, and exporting a break. |
| STRETCHER | Tempo and pitch processing with FLUID; comparing the original and current audio. |
| CHOPPER | Equal divisions, automatic transient cuts, manual cuts, live chopping, and listening-artifact export. |
| MAPPER | 64 pads, CHROMA mapping, sample loops, program settings, mixer, synth, effects, and PGM/sample export. |
| SEQUENCER | MIDI and ALL sequences, piano roll, tracker, swing, note variations, and THEORY. |
| ☰ Preferences | MIDI input, skins, licensing, preview behavior, keyboard shortcuts, and placement compensation. |
The main window shares one working waveform across STRETCHER, CHOPPER, and MAPPER. DIGGER's preview is separate until you load or truncate it. MAPPER samples capture audio when assigned: changing the working waveform later does not refresh those samples.
Zoom and pan: use the waveform's mouse wheel or zoom buttons; hold the middle mouse button and drag horizontally to pan. Fit shows the whole waveform. Drag the panel dividers to give controls or the waveform more space; scroll inside long settings pages.
Numeric editing: many fields support typing, vertical dragging, and step arrows. Commit typed values with Enter or by leaving the field. MAPPER numeric fields also support middle-click selection followed by wheel adjustment.
Undo: Ctrl+Z restores the latest editor action across workspaces. One drag counts as one action. Undo has one level and no redo; playback and navigation do not replace the edit record. Undo does not remove or revert files already exported.
3 · Open files and audio formats
DIGGER and the MAPPER browser accept WAV, Akai MPC SND, and the other formats listed in the audio browser. Common examples include AIFF, FLAC, MP3, Ogg/Vorbis, Opus, AU, and CAF. SYNTH accepts the same audio formats.
Headerless RAW/PCM requires you to specify sample rate, channels, encoding, and byte order. The application remembers that choice for the file during the session. Wrong settings can produce noise or incorrect playback speed.
Foreign audio containers are decoded for editing; their original tags and loop metadata are not imported. WAV and Akai SND have dedicated sampler metadata handling. Importing FLAC or MP3 does not make those formats available for export.
To reopen a sampler program, use MAPPER → OPEN and select its PGM. Place its WAV/SND samples in the same folder. Missing or invalid samples stop the import while preserving the currently open program. To open a sequence, use SEQUENCER → Import MIDI / ALL.
4 · DIGGER
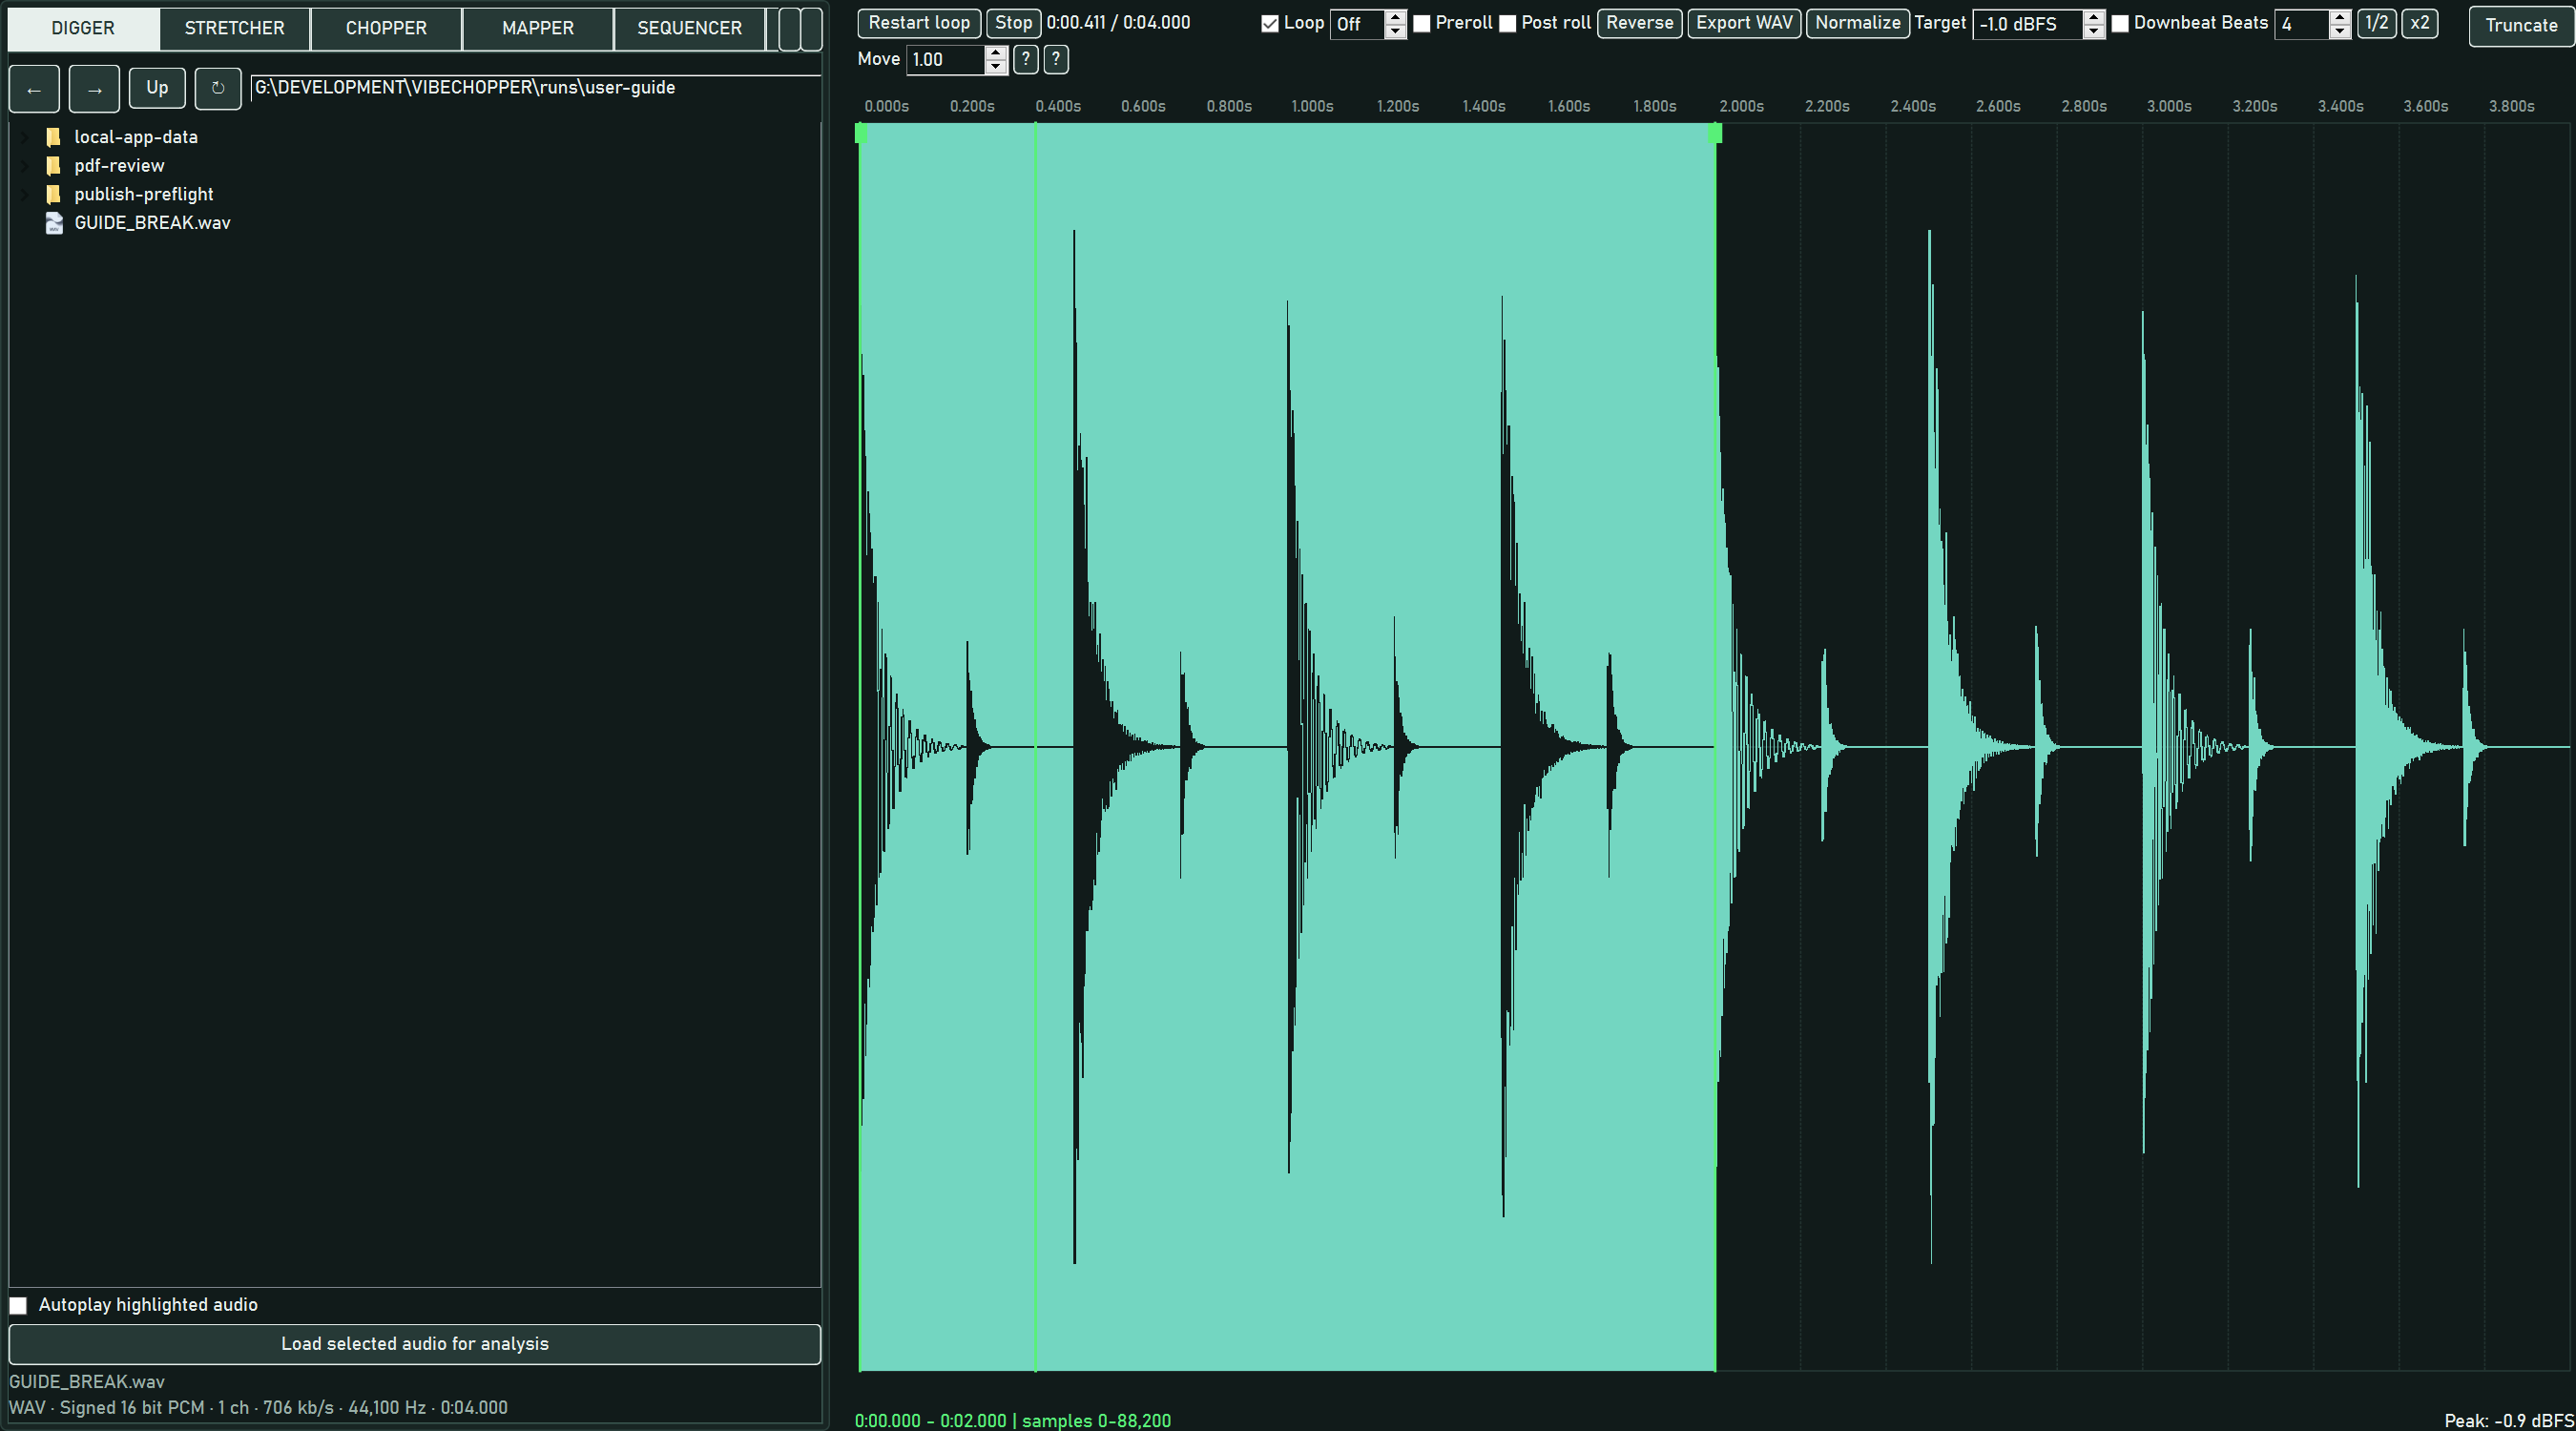
Use the path field, Up, back/forward, and refresh controls to navigate folders. Highlight a supported file to load its waveform. Autoplay is optional and remembered; opening a file for preview does not replace the working CHOPPER waveform.
Select and audition a break
Drag across the waveform to mark a range, then drag its in/out handles to refine it. Loop repeats the highlighted range. Play/Space restarts an enabled loop; Stop ends playback. H and ; jump playback to the inpoint and outpoint. I/O set endpoints from the playback position, and arrow keys jog the selected endpoint.
Beats describes the highlighted selection; Move describes how many beats to shift it. With 4 selected beats and Move 1, the selection-shift arrows move both endpoints by one quarter of the selection length. The range stops at file boundaries without getting shorter. The 1/2 and x2 buttons adjust the beat count.
Preroll, post roll, and downbeat
The roll division starts at Off. With Preroll enabled, releasing an edited outpoint restarts near its end: 4 auditions the last quarter, 8 the last eighth, and 1 the full selection, before wrapping normally. Post roll instead auditions selection-length/division beyond the outpoint before wrapping, limited by the available source audio. The two modes are mutually exclusive and add no audio to your export.
Enable Downbeat, then Shift-click inside the selection or drag the DOWNBEAT marker. Truncate and Export WAV rotate the range to begin at that point, moving the earlier portion to the end. The selected duration stays the same. Use this when the musical start is inside an otherwise useful loop.
Edit and send the selection
Reverse reverses the selected audio. Normalize applies one gain across its channels to reach the Target peak; the default is −1 dBFS. These are audio edits. The J reverse-transport shortcut auditions backwards without making that edit.
Truncate creates working audio from the selected range and loads it into CHOPPER. Export WAV saves that same range, including enabled downbeat rotation, at the source sample rate and the applicable WAV encoding. Load selected audio for analysis loads the complete highlighted file instead.
5 · STRETCHER and FLUID
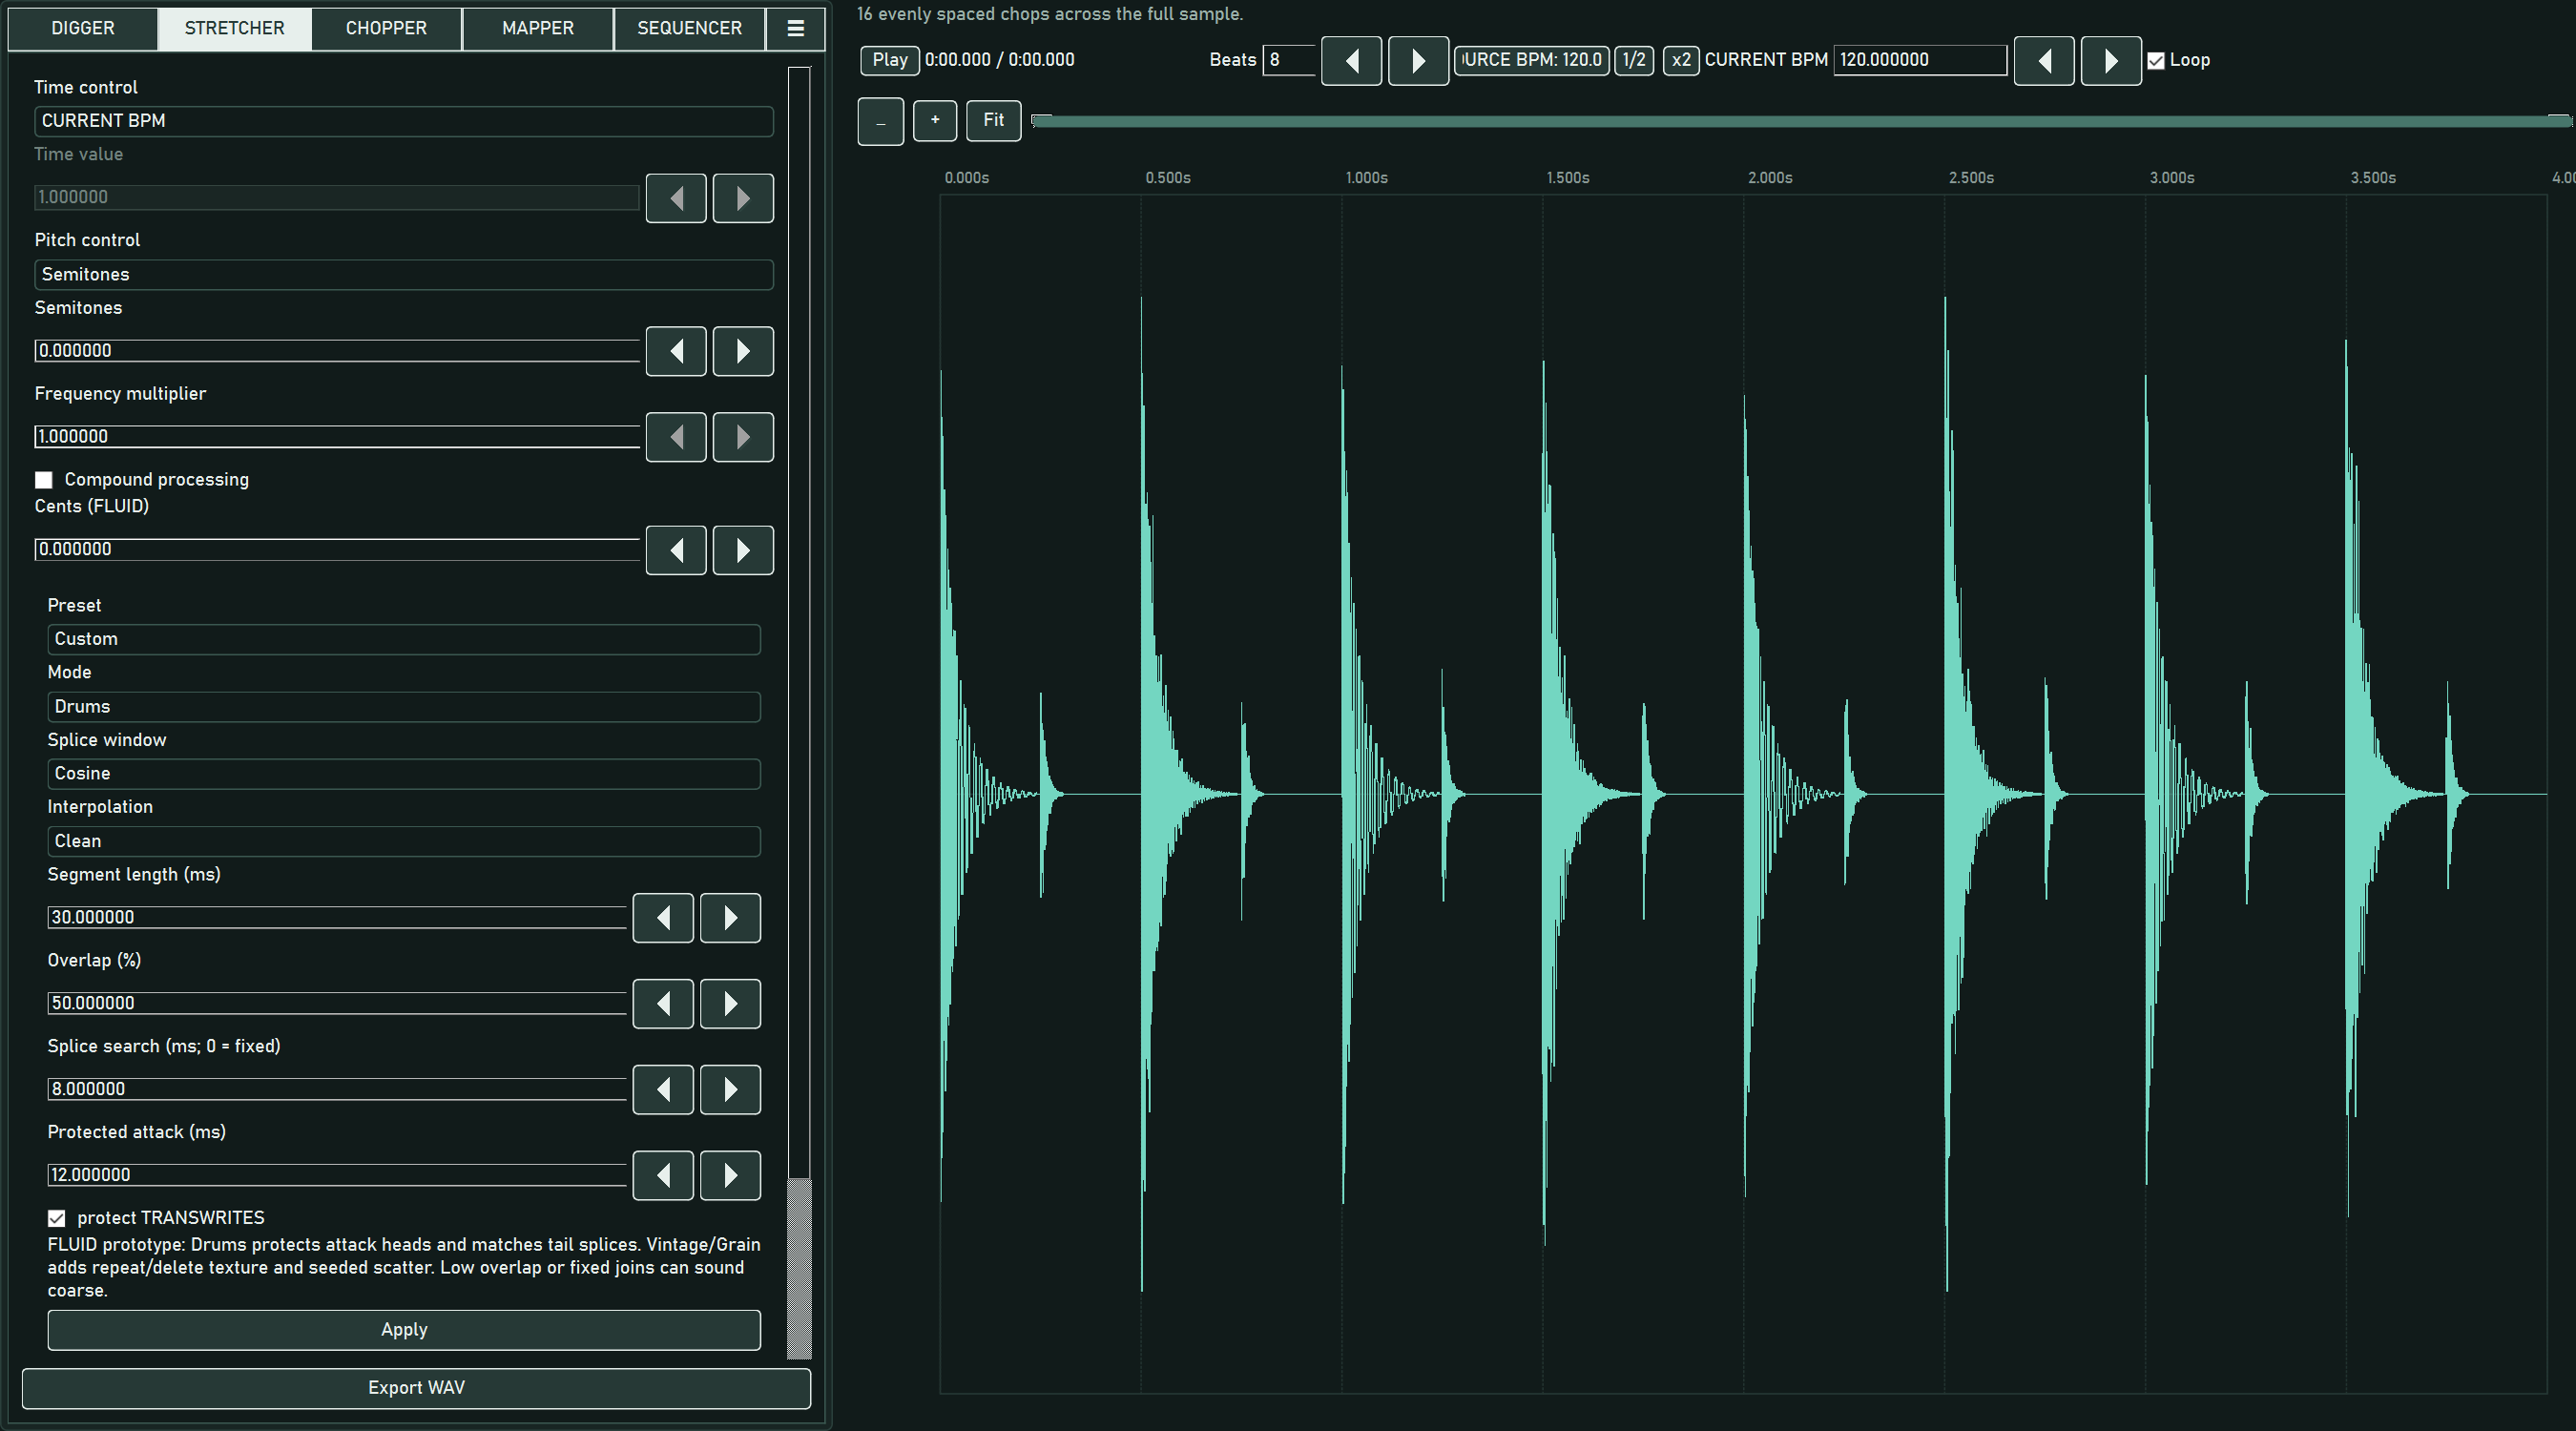
- Enter Beats for the entire loaded waveform, including any leading or trailing audio. Source BPM = 60 × beats ÷ duration in seconds.
- Choose a preset or mode, then change CURRENT BPM. Typed BPM applies on Enter or when leaving the field; dragging applies changed values.
- Use Audition original and Audition current to compare. Adjust settings and click Apply where needed.
- Click Export WAV to save the full current waveform as 32-bit float WAV, at its current sample rate and channel count.
| FLUID mode | What to listen for |
|---|---|
| Drums | Attack definition and spacing on rhythmic material; transient protection can preserve attack heads. |
| Complex | Mixed or harmonic material; phase locking and optional harmonic/percussion separation affect clarity and smearing. |
| Voice | Vocal or sustained tonal material; envelope preservation can reduce tonal changes during pitch shifts. Keys and Vocal presets provide starting points. |
| Vintage/Grain | Audible grain and splice character; experiment with segment size, overlap, interpolation, and scatter. |
| Varispeed | Linked pitch and speed, like changing playback rate. Independent pitch controls are disabled. |
Time control also accepts duration ratio, tempo multiplier, or target seconds. A duration ratio of 2 doubles length; a tempo multiplier of 2 doubles speed and halves length. In CURRENT BPM mode, Time value is disabled.
Pitch control accepts semitones plus cents, or a frequency multiplier. Leave semitones/cents at zero to preserve pitch during stretching. Leave tempo unchanged for pitch-only processing outside Varispeed.
Compound processing is initially off: renders use the original loaded source. Enable it to process the current result again. The toggle itself does not render. SOURCE BPM restores the original audio and the cuts captured before the first stretch.
Advanced controls include FFT size and spectral overlap, segment length, splice overlap/search/window, attack protection, percussion grain, envelope preservation, interpolation, and seeded scatter. protect TRANSWRITES uses transient analysis; disable it to process a continuous region without attack protection. Compare results by listening; no mode guarantees artifact-free audio.
Rendering runs in the background with progress and Cancel render. Current audio and cut positions update on completion; cuts and excluded regions scale with duration. Existing MAPPER assignments retain their captured audio until reassigned. Play/Space toggles playback; Loop highlighted range loops the selection, or the whole waveform when no range is highlighted.
6 · CHOPPER and TRANSWRITE
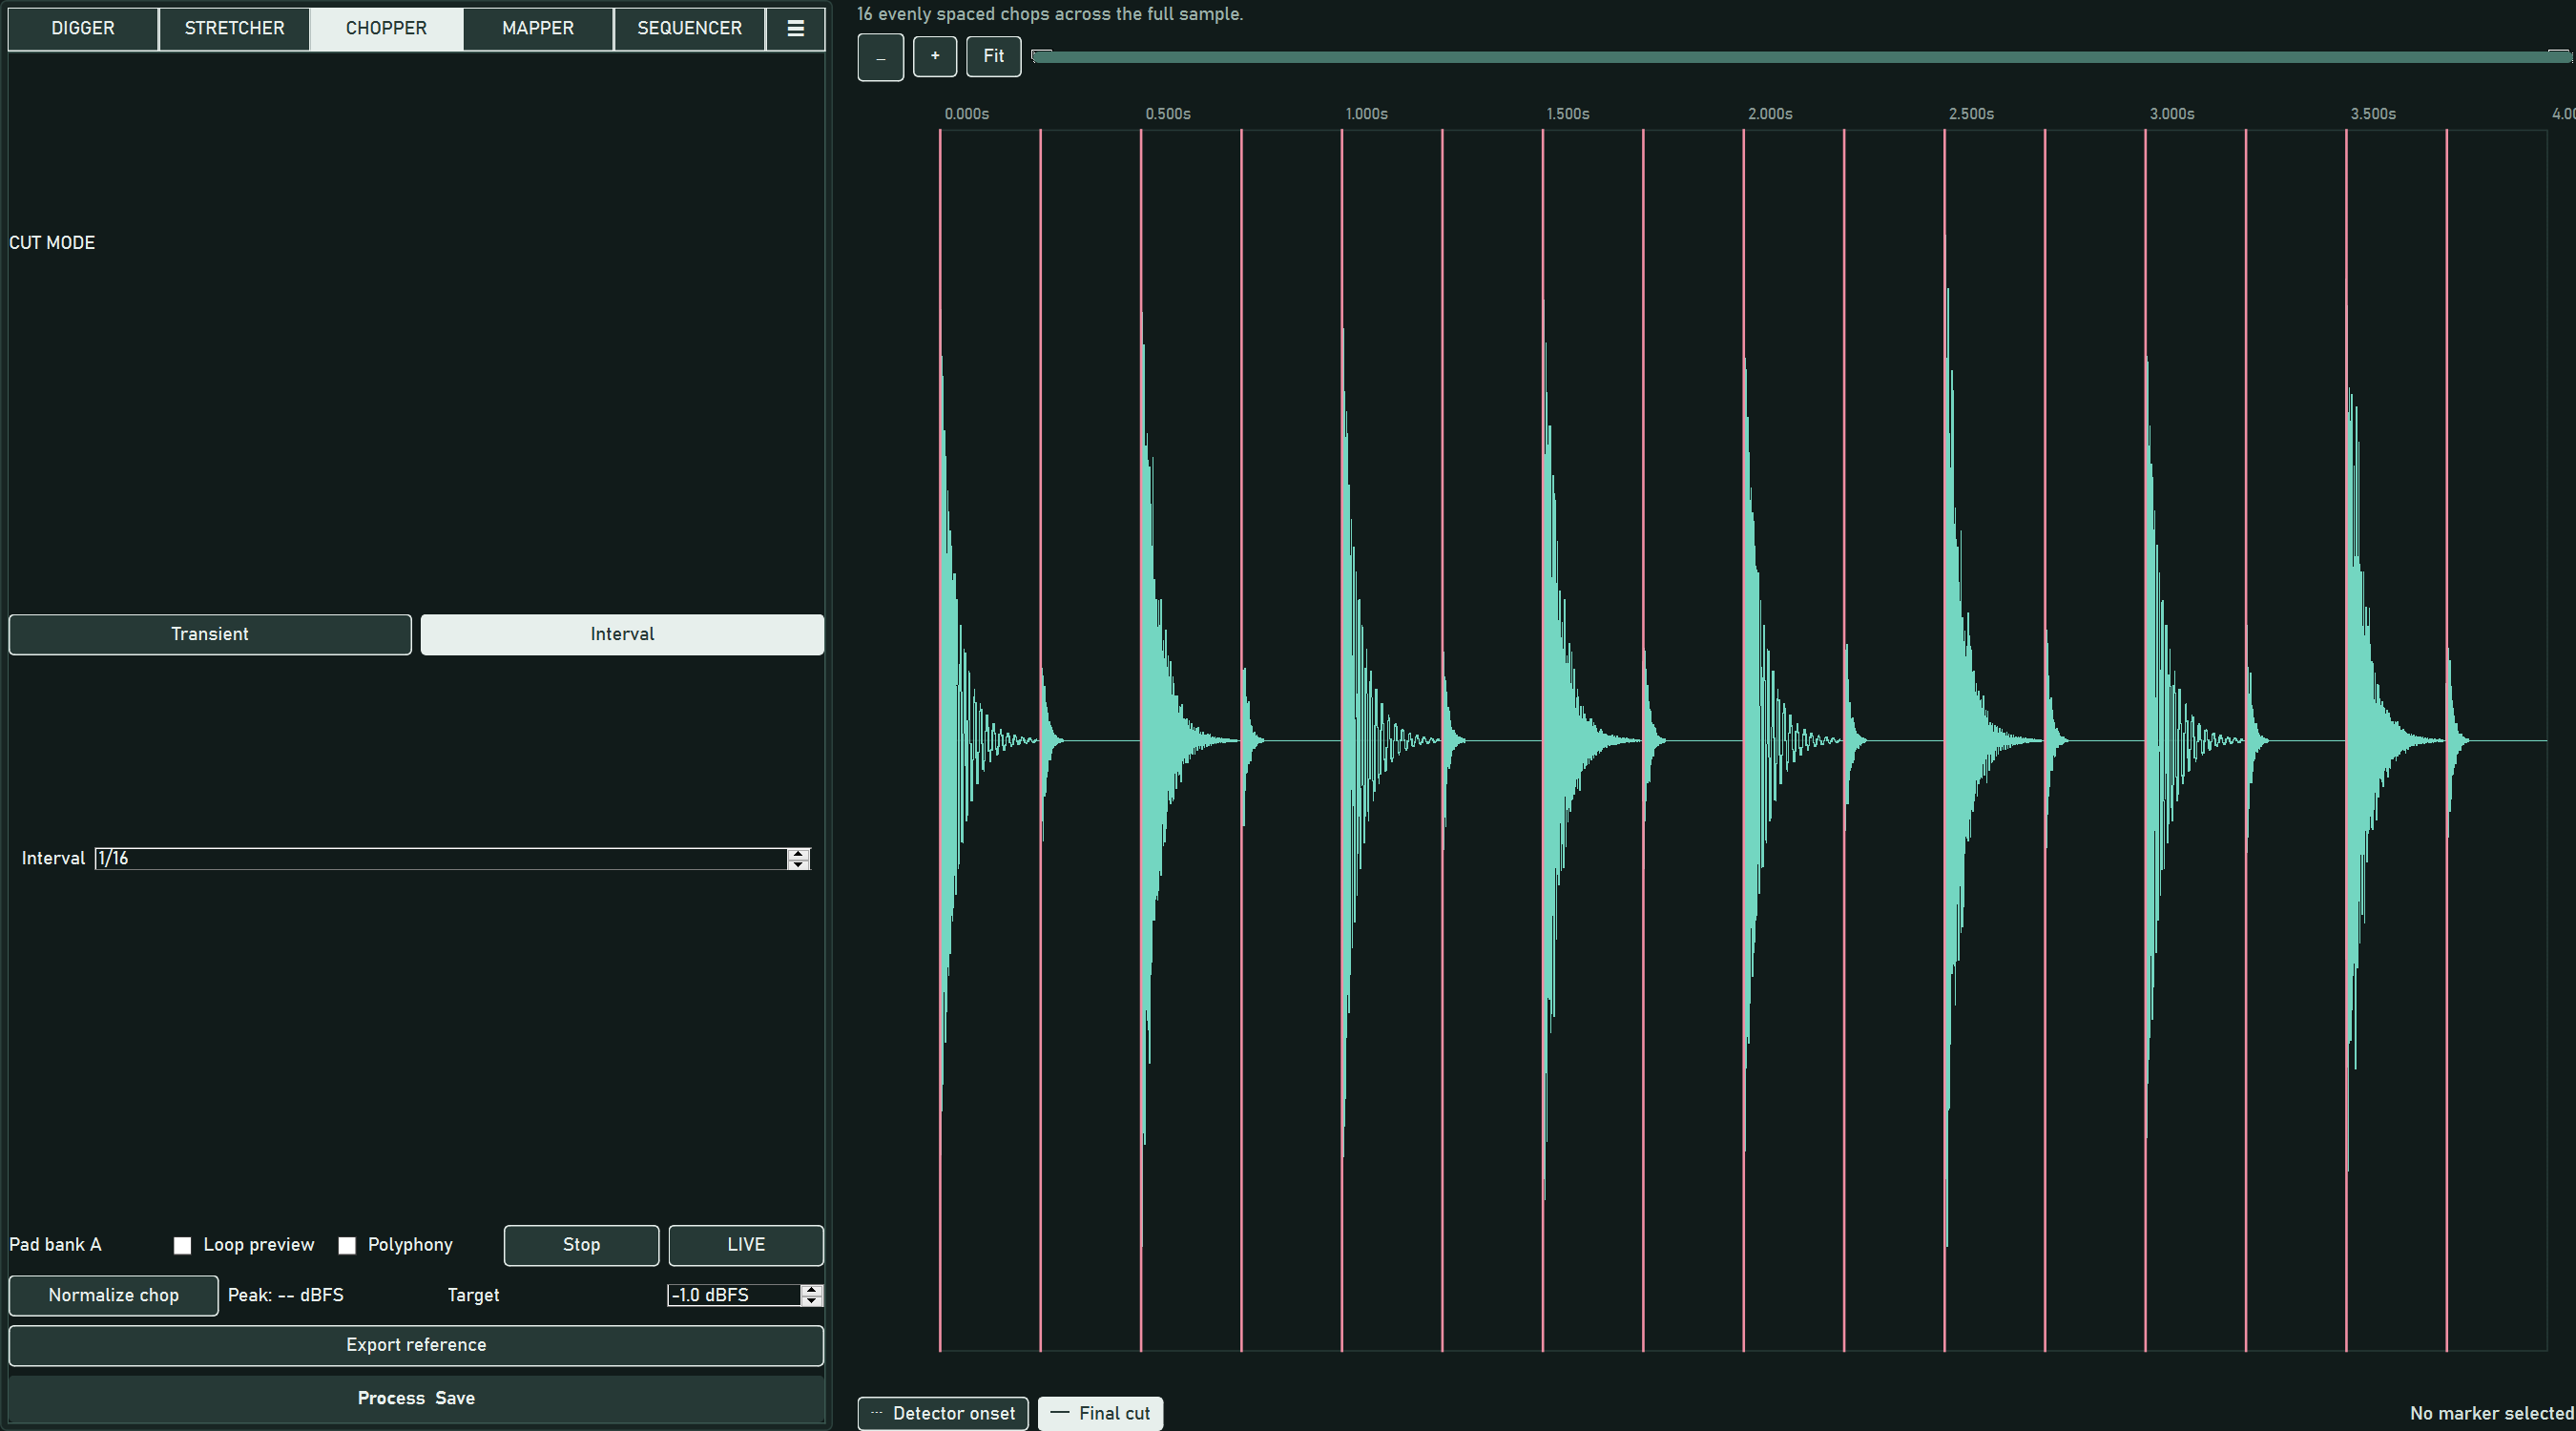
Interval divides the entire waveform by the displayed count: 1/8 makes eight equal chops, 1/16 makes sixteen. CHOPPER starts in Interval mode. Changing the count rebuilds the grid.
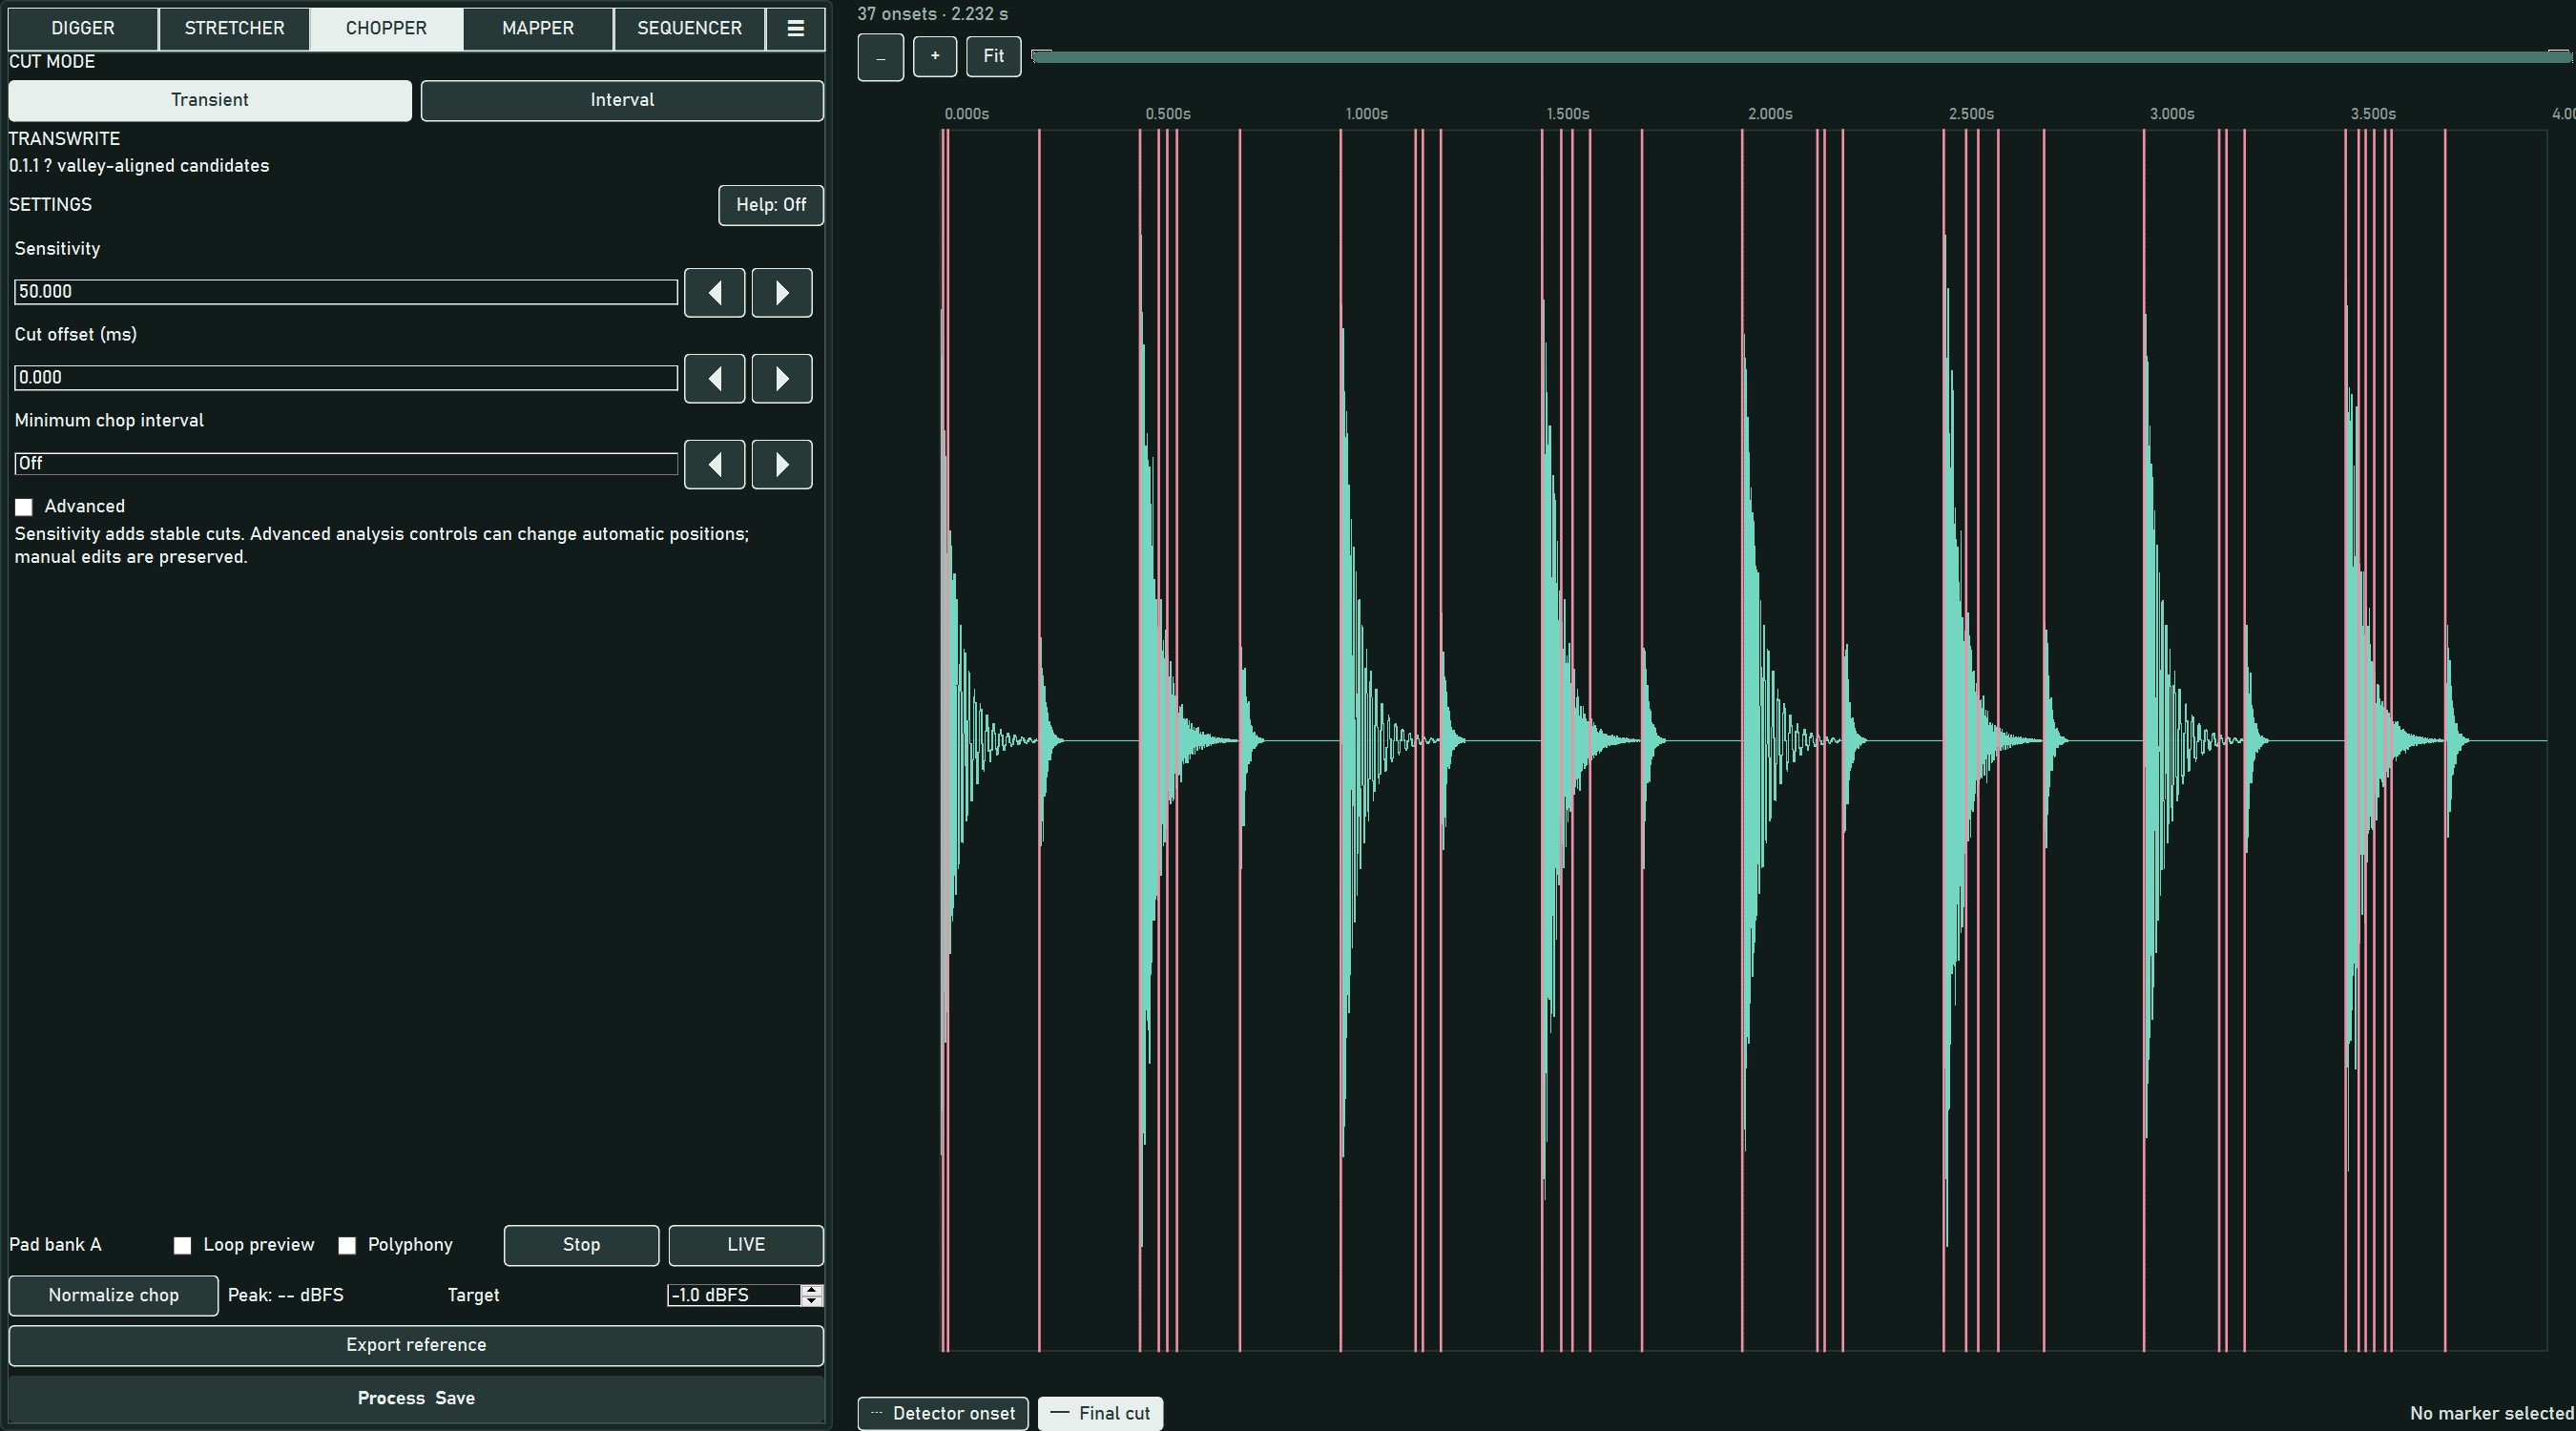
Transient detects attacks with TRANSWRITE. Start around Sensitivity 50 and Cut offset 0 ms, then listen and adjust. Higher sensitivity can reveal weaker candidates; sensitivity changes do not shift unchanged automatic cut positions. Cut offset moves boundaries uniformly, including manual cuts.
Advanced settings include minimum slice length, valley lookback, envelope smoothing, noise window, and tail suppression. Help enables descriptions over setting labels. Analysis settings recompute candidates; sensitivity and offset reuse analysis where possible.
Switching between Transient and Interval clears the previous cuts, manual edits, deletions, and excluded regions. Export a reference first if you need to retain the annotation.
Refine and play chops
- Click inside a chop to select and audition it; the selected region is pale yellow in the default skin.
- Drag a final-cut line to move it. Double-click to add a cut and immediately preview the new slice.
- Select a cut line and press Delete to remove that boundary. Click within a chop and press Delete to mark it excluded; press Delete again to restore it. Excluded regions appear red.
- Detector onset visibility is separate from final cuts. Use the toggles beneath the waveform to show the candidate guide or final boundaries.
- Enable Loop preview to repeat the selected chop. Polyphony allows keyboard/MIDI slices to overlap. Stop ends the preview.
- Normalize chop changes the selected chop to the target peak without moving its cut markers.
LIVE is manual chopping: use J/K/L transport and press I to record cuts as audio plays. Automatic detection is off while LIVE is enabled. F1–F4 choose performance banks; ZXCV / ASDF / QWER / 1234 play sixteen slices per bank.
Chops start at explicit final cuts. Audio before the first cut is not automatically a chop. AUTOMAP, drag assignment, and chop export skip excluded regions. MAPPER export also omits captured chops overlapping a currently excluded region of their source.
Save cuts or listening material
Export reference writes the current full waveform as float WAV plus a matching .cuts.json file containing final cut frame positions, timestamps, and exclusions. This pair preserves audio and cut positions; it does not store a complete session.
Process & Save writes a listening folder with with_clicks.wav, individual WAV chops, onsets.json, raw_onsets.json, manual_boundaries.json, and metadata.json. These outputs let you listen to cut placement and inspect settings; they are separate from MAPPER's hardware program export.
7 · MAPPER pads
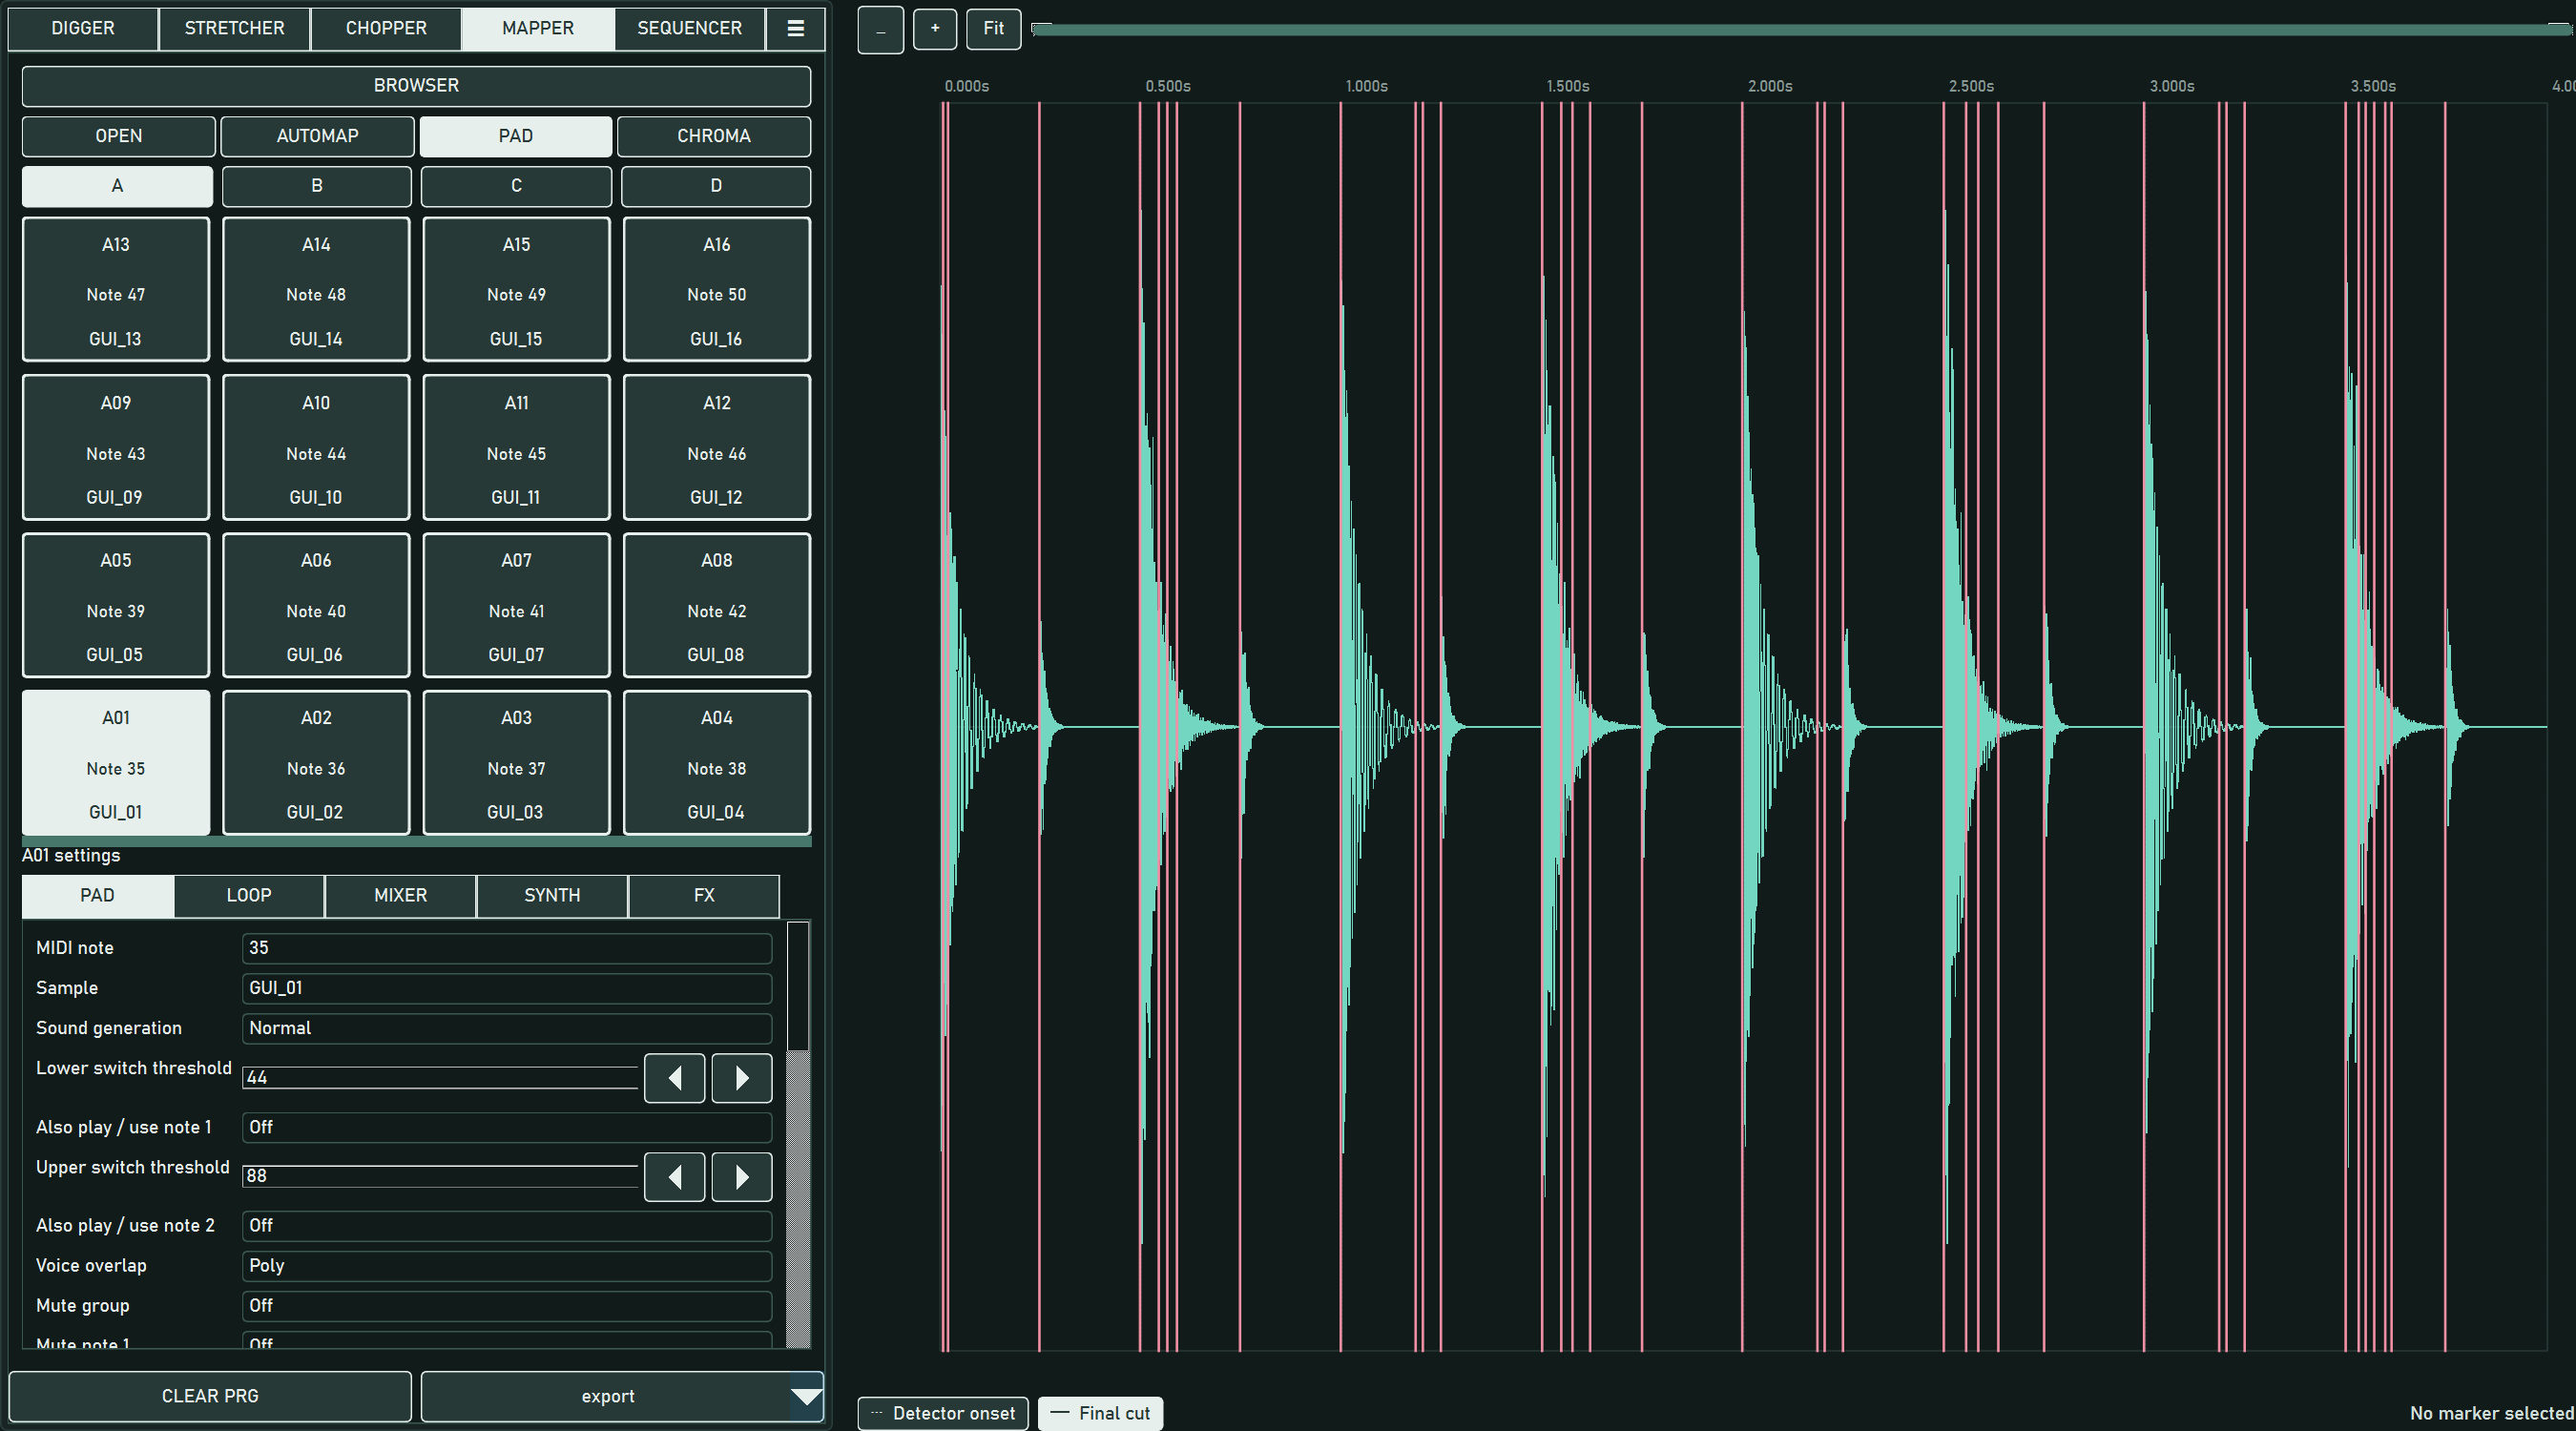
AUTOMAP replaces all assignments and settings with the working chops in timeline order, beginning at the first final cut and A01. It maps at most 64 chops, clears unused pads, and reports overflow. Use it after editing cuts if you want fresh snapshots.
To keep an existing program, drag individual waveform chops onto pads instead. You can also drag audio files from BROWSER. Drag an occupied pad's face or number onto another pad to move it to an empty destination or swap two occupied pads, carrying the sample and its settings.
Click the pad number to select and audition it; click its sample name to rename it. Banks A–D or F1–F4 select the active bank. The PAD tab controls sample assignment, sound generation, linked notes, voice overlap, mute group, tuning, amplitude/filter envelopes, velocity response, and note-variation/slider settings.
Tuning uses tenths of a semitone: 10 = one semitone, 120 = one octave. The permitted range is −360 to +360. Preview simulates filtering, envelopes, pan, level, tuning, linked notes, and selected effects; it is an approximation of the MPC.
Mute group Off or 1–4 chokes previously playing voices in the same group. Standard program export stores the Vu-compatible groups in the generation byte. Stock-compatible export changes those group values to Normal. Do not assume stock firmware understands the modified-firmware values.
Right-click supported PAD or LOOP values and choose All to apply the value broadly. PAD values apply across A–D; LOOP values apply to assigned samples, including shared samples. Changes to a shared sample affect every pad using it.
Use ☰ → Preview Mapper setting changes to enable or disable automatic retrigger after committing a parameter edit. Disabling this keeps edits silent while pad clicks, performance keys, and MIDI still play. CLEAR PRG removes samples and resets program settings; the last action can be undone.
8 · CHROMA and multisamples
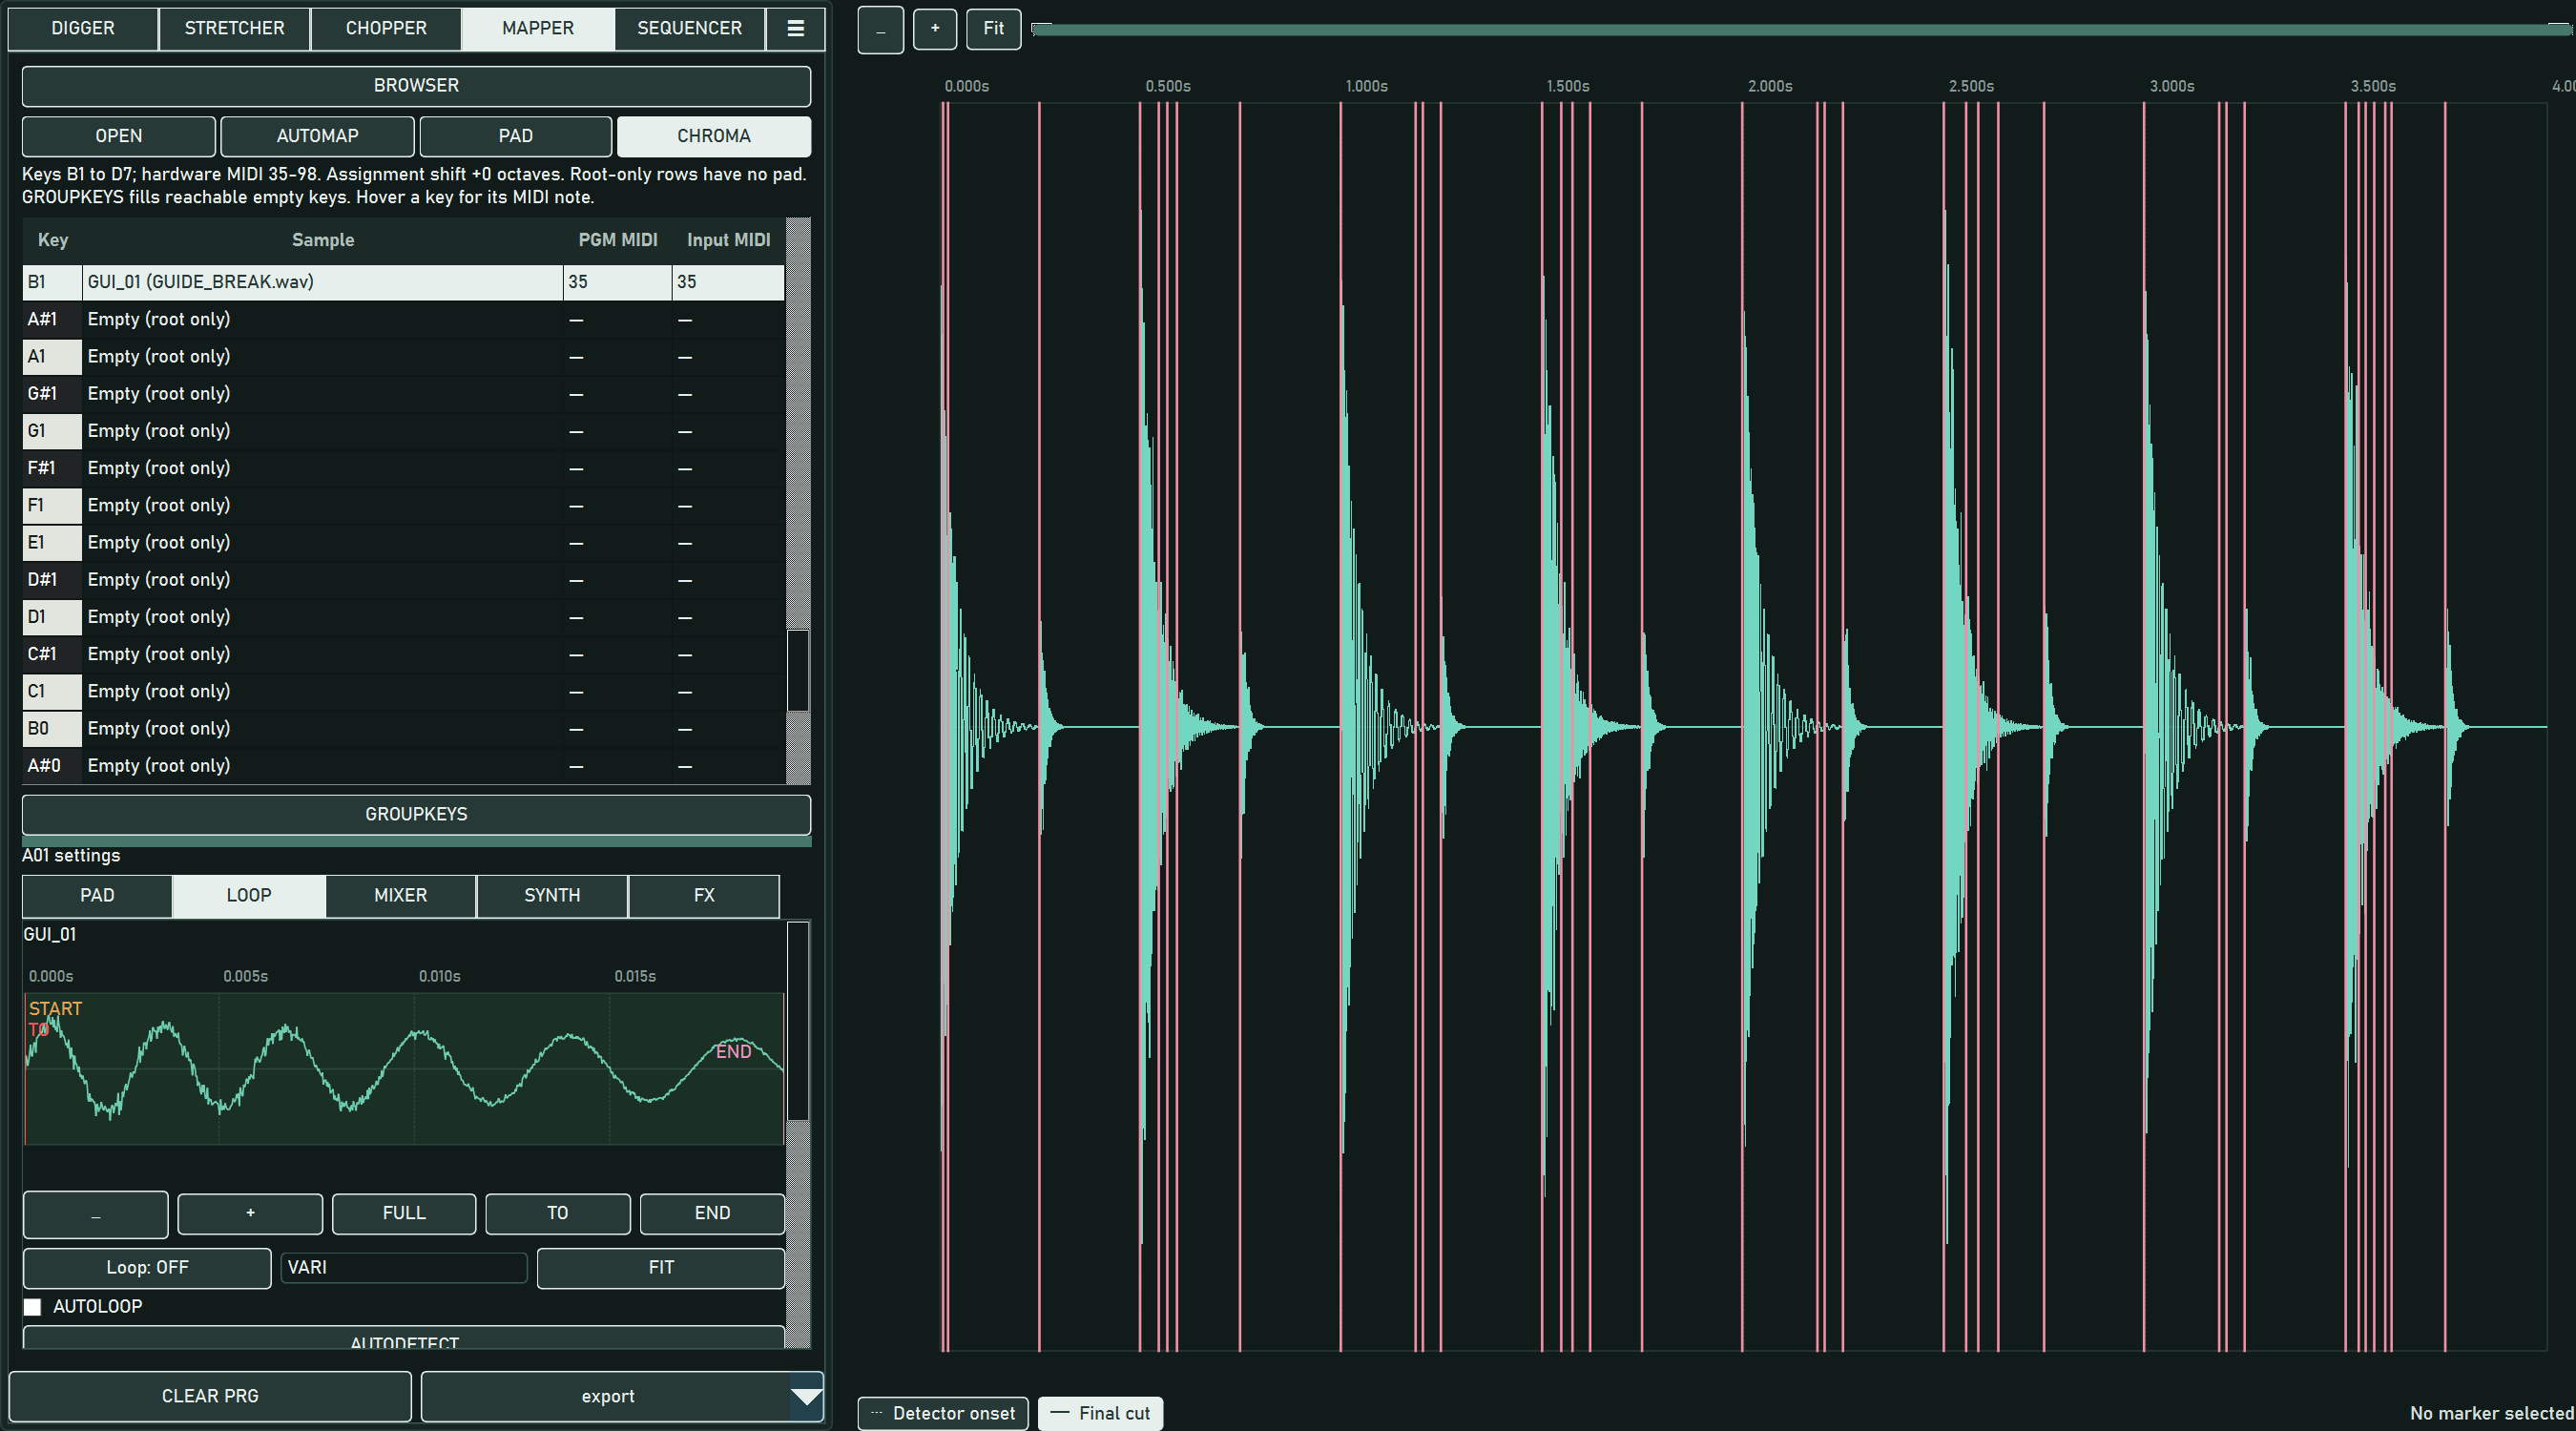
- Click CHROMA, open BROWSER, and drop each sample on its original pitch. New roots start with zero tuning.
- For multiple named samples, Ctrl/Shift-select files and click AUTOASSIGN. This infers roots from filenames such as A 2 or F#3; it does not measure pitch.
- Review conflicts and skipped files. Duplicate roots, ambiguous names, and unreadable files are reported.
- Click GROUPKEYS to fill empty keys from the nearest reachable root. Equal distances prefer the lower root. Existing assignments are retained.
- Play across the range and listen for bad root guesses, tuning, or uneven sample transitions before exporting.
The hardware mapping is fixed at MIDI 35–98, A01 through D16. Plain chromatic labeling uses C4 = MIDI 60. GROUPKEYS adds 10 tuning units per semitone relative to the root, within ±360; unreachable keys require another root or remain empty after confirmation.
mapmax fits filename roots by whole octaves and anchors musical C2 at hardware MIDI 35. It improves range coverage without pitch-shifting root audio. CHROMA shows the display shift separately. Existing programs keep their musical range; clear the program before choosing a new Mapmax range.
Mapmax's musical-range annotation and out-of-range root-only rows are session-only. PGM retains playable sample assignments, tuning, and hardware notes, but cannot reconstruct those display annotations when reopened.
Switching PAD/CHROMA preserves the program. Opening a PGM in the GUI normalizes pad routing to the ascending MIDI mapping while retaining sounds/settings and updating linked references; do not expect arbitrary original pad routing to remain unchanged.
9 · Sample loops
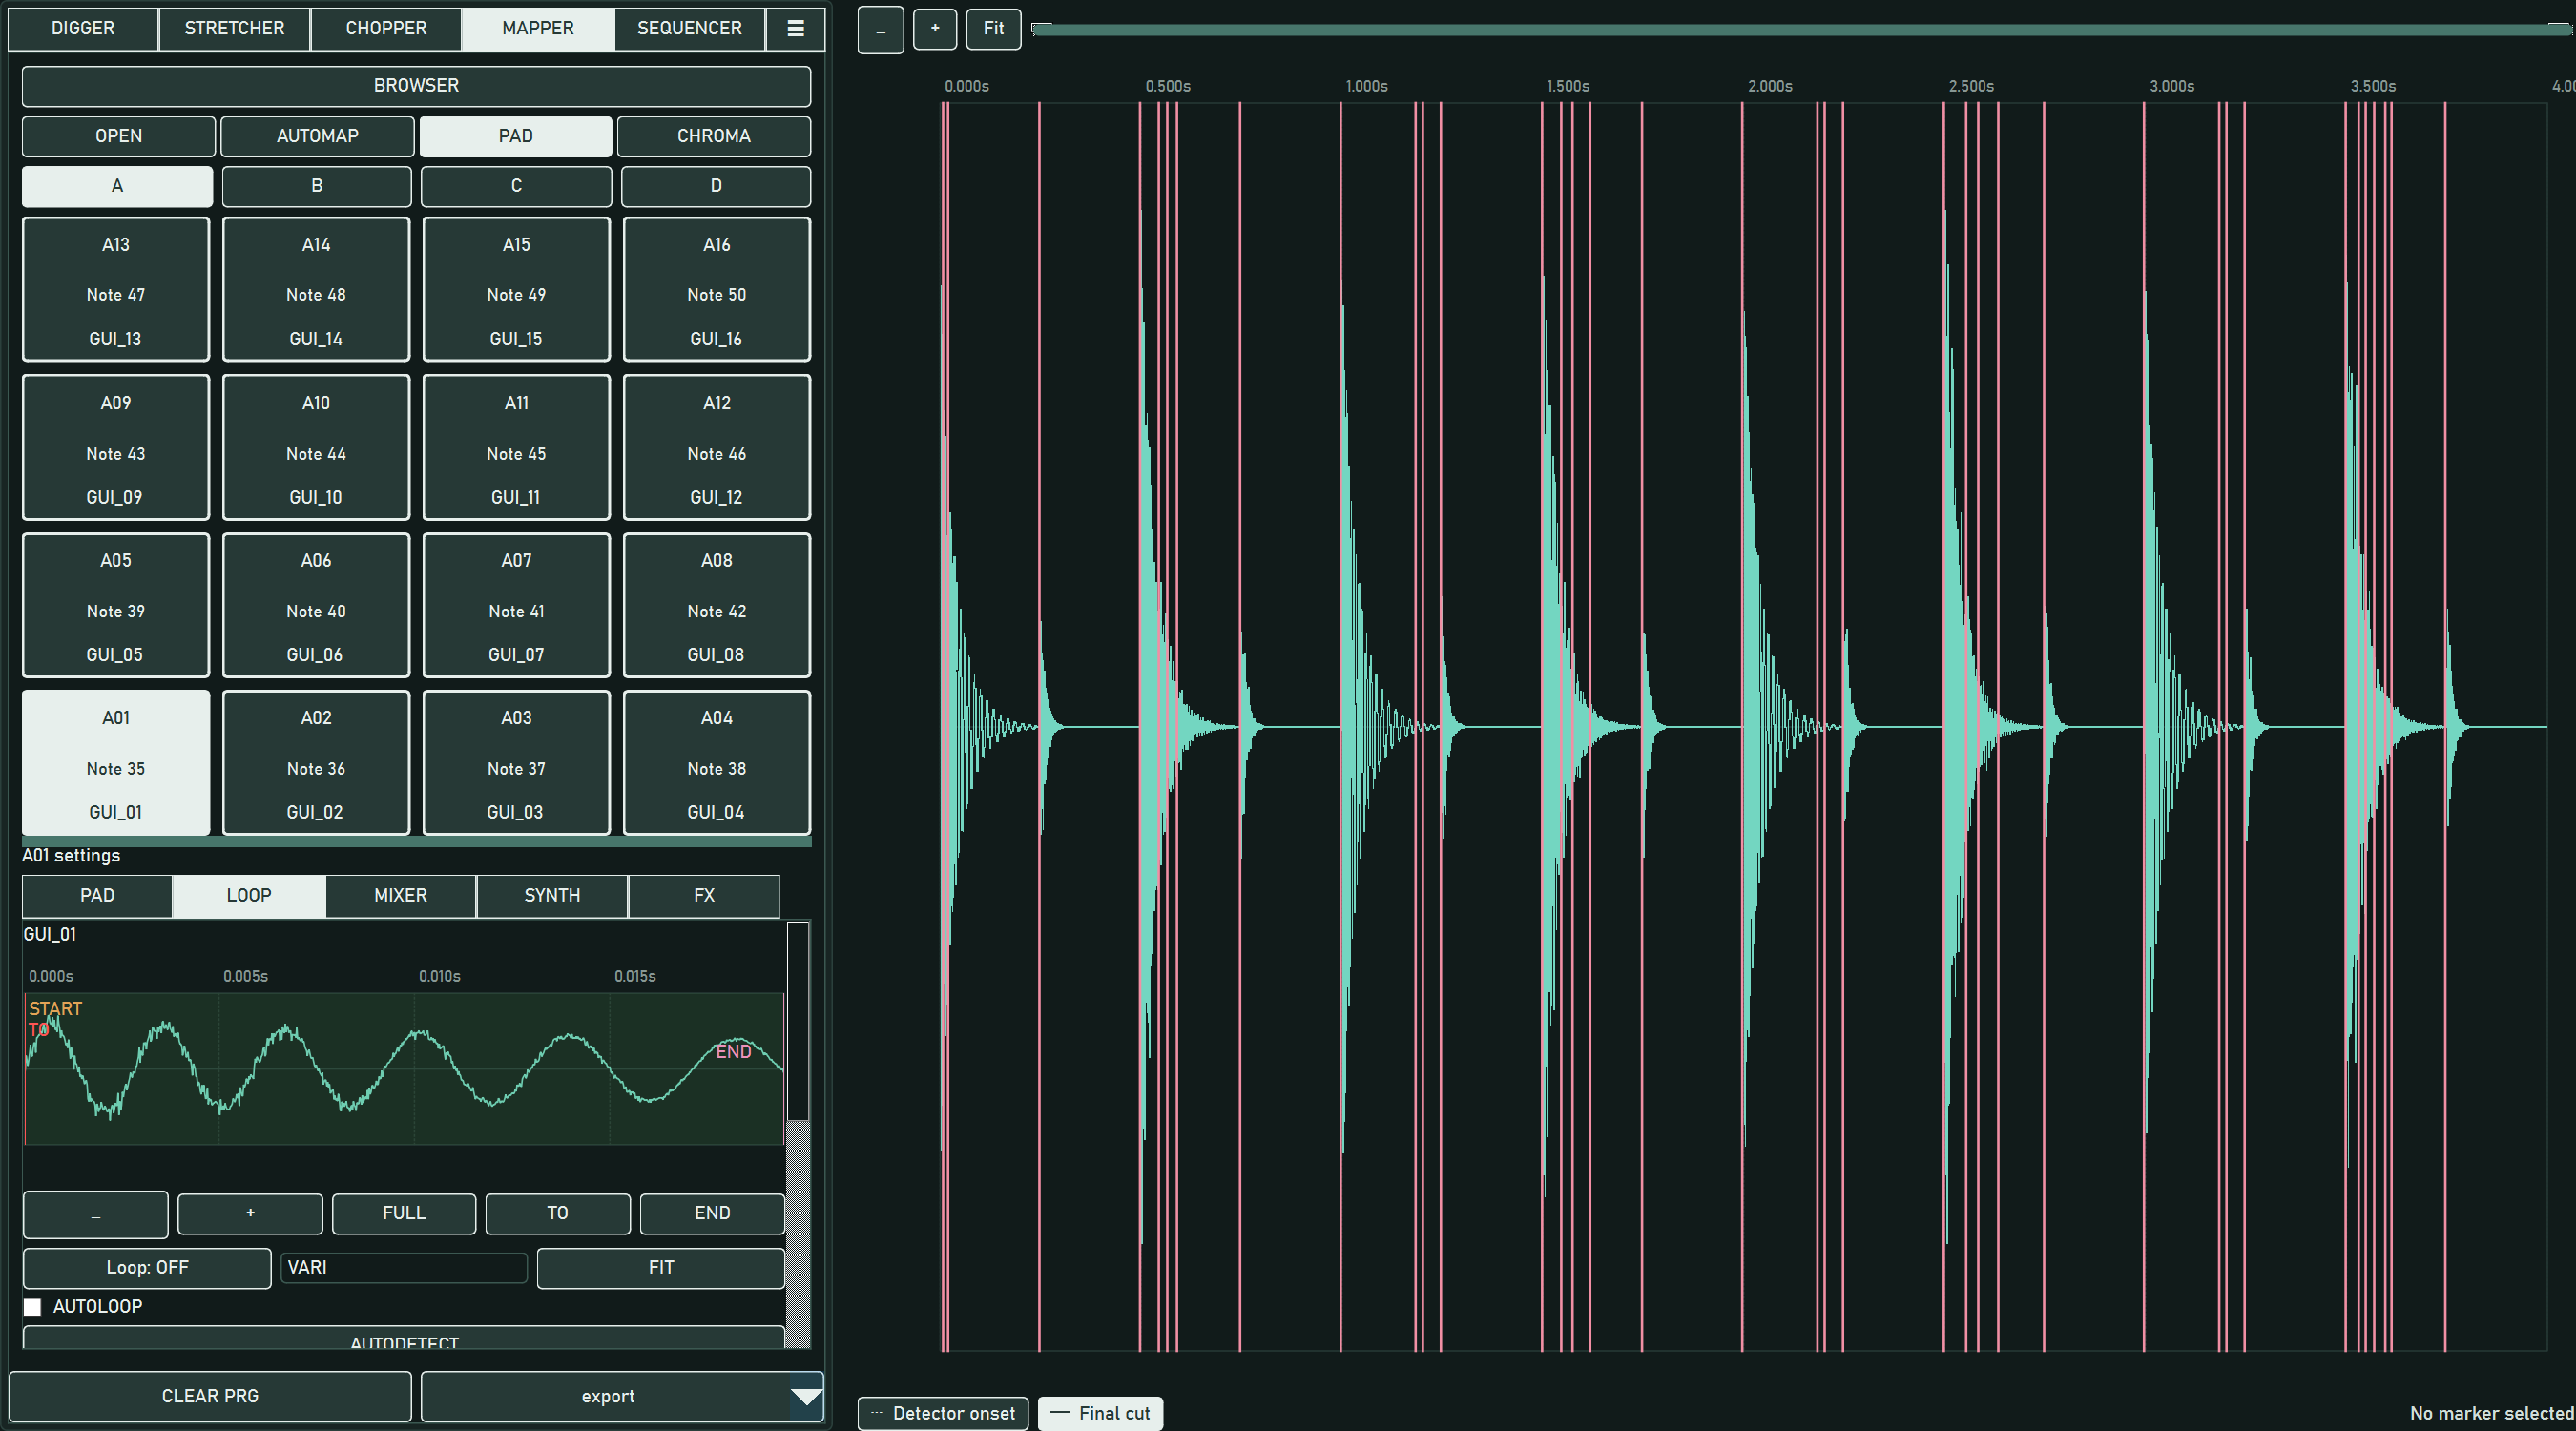
Right-click an assigned pad/key or choose its LOOP tab. Start is the attack/trim start, To is the loop start, and End is shared by trim and loop. End is exclusive. Values are sample frames; stereo frames contain both channels.
Drag waveform markers or type/drag the fields. VARI keeps End fixed when To moves; FIX moves To and End together to preserve loop length. FIT fits the loop to the Start/End trim region. AUTODETECT searches for matching zero crossings in a stable tone; it changes points, not sample audio.
Enable Loop: ON and hold a keyboard/MIDI note to hear the attack followed by repeated To→End audio. Releasing the trigger releases its voices. Loop ON with decay END forces effective NOTE OFF overlap; turning off that override restores the previous overlap choice.
AUTOLOOP keeps mouse previews running after release for editing. It is preview-only; keyboard and MIDI still follow note-off. PLAY X auditions LOOP, TRIM, ALL, material before Start, or material after End. Stop ends that audition.
Classic SND export stores loop data in the SND header; XL WAV export stores sampler loop metadata in the WAV. Sharp loop endpoints can click: the preview engine does not automatically fade discontinuities. Adjust points and listen before saving.
10 · Mixer and effects
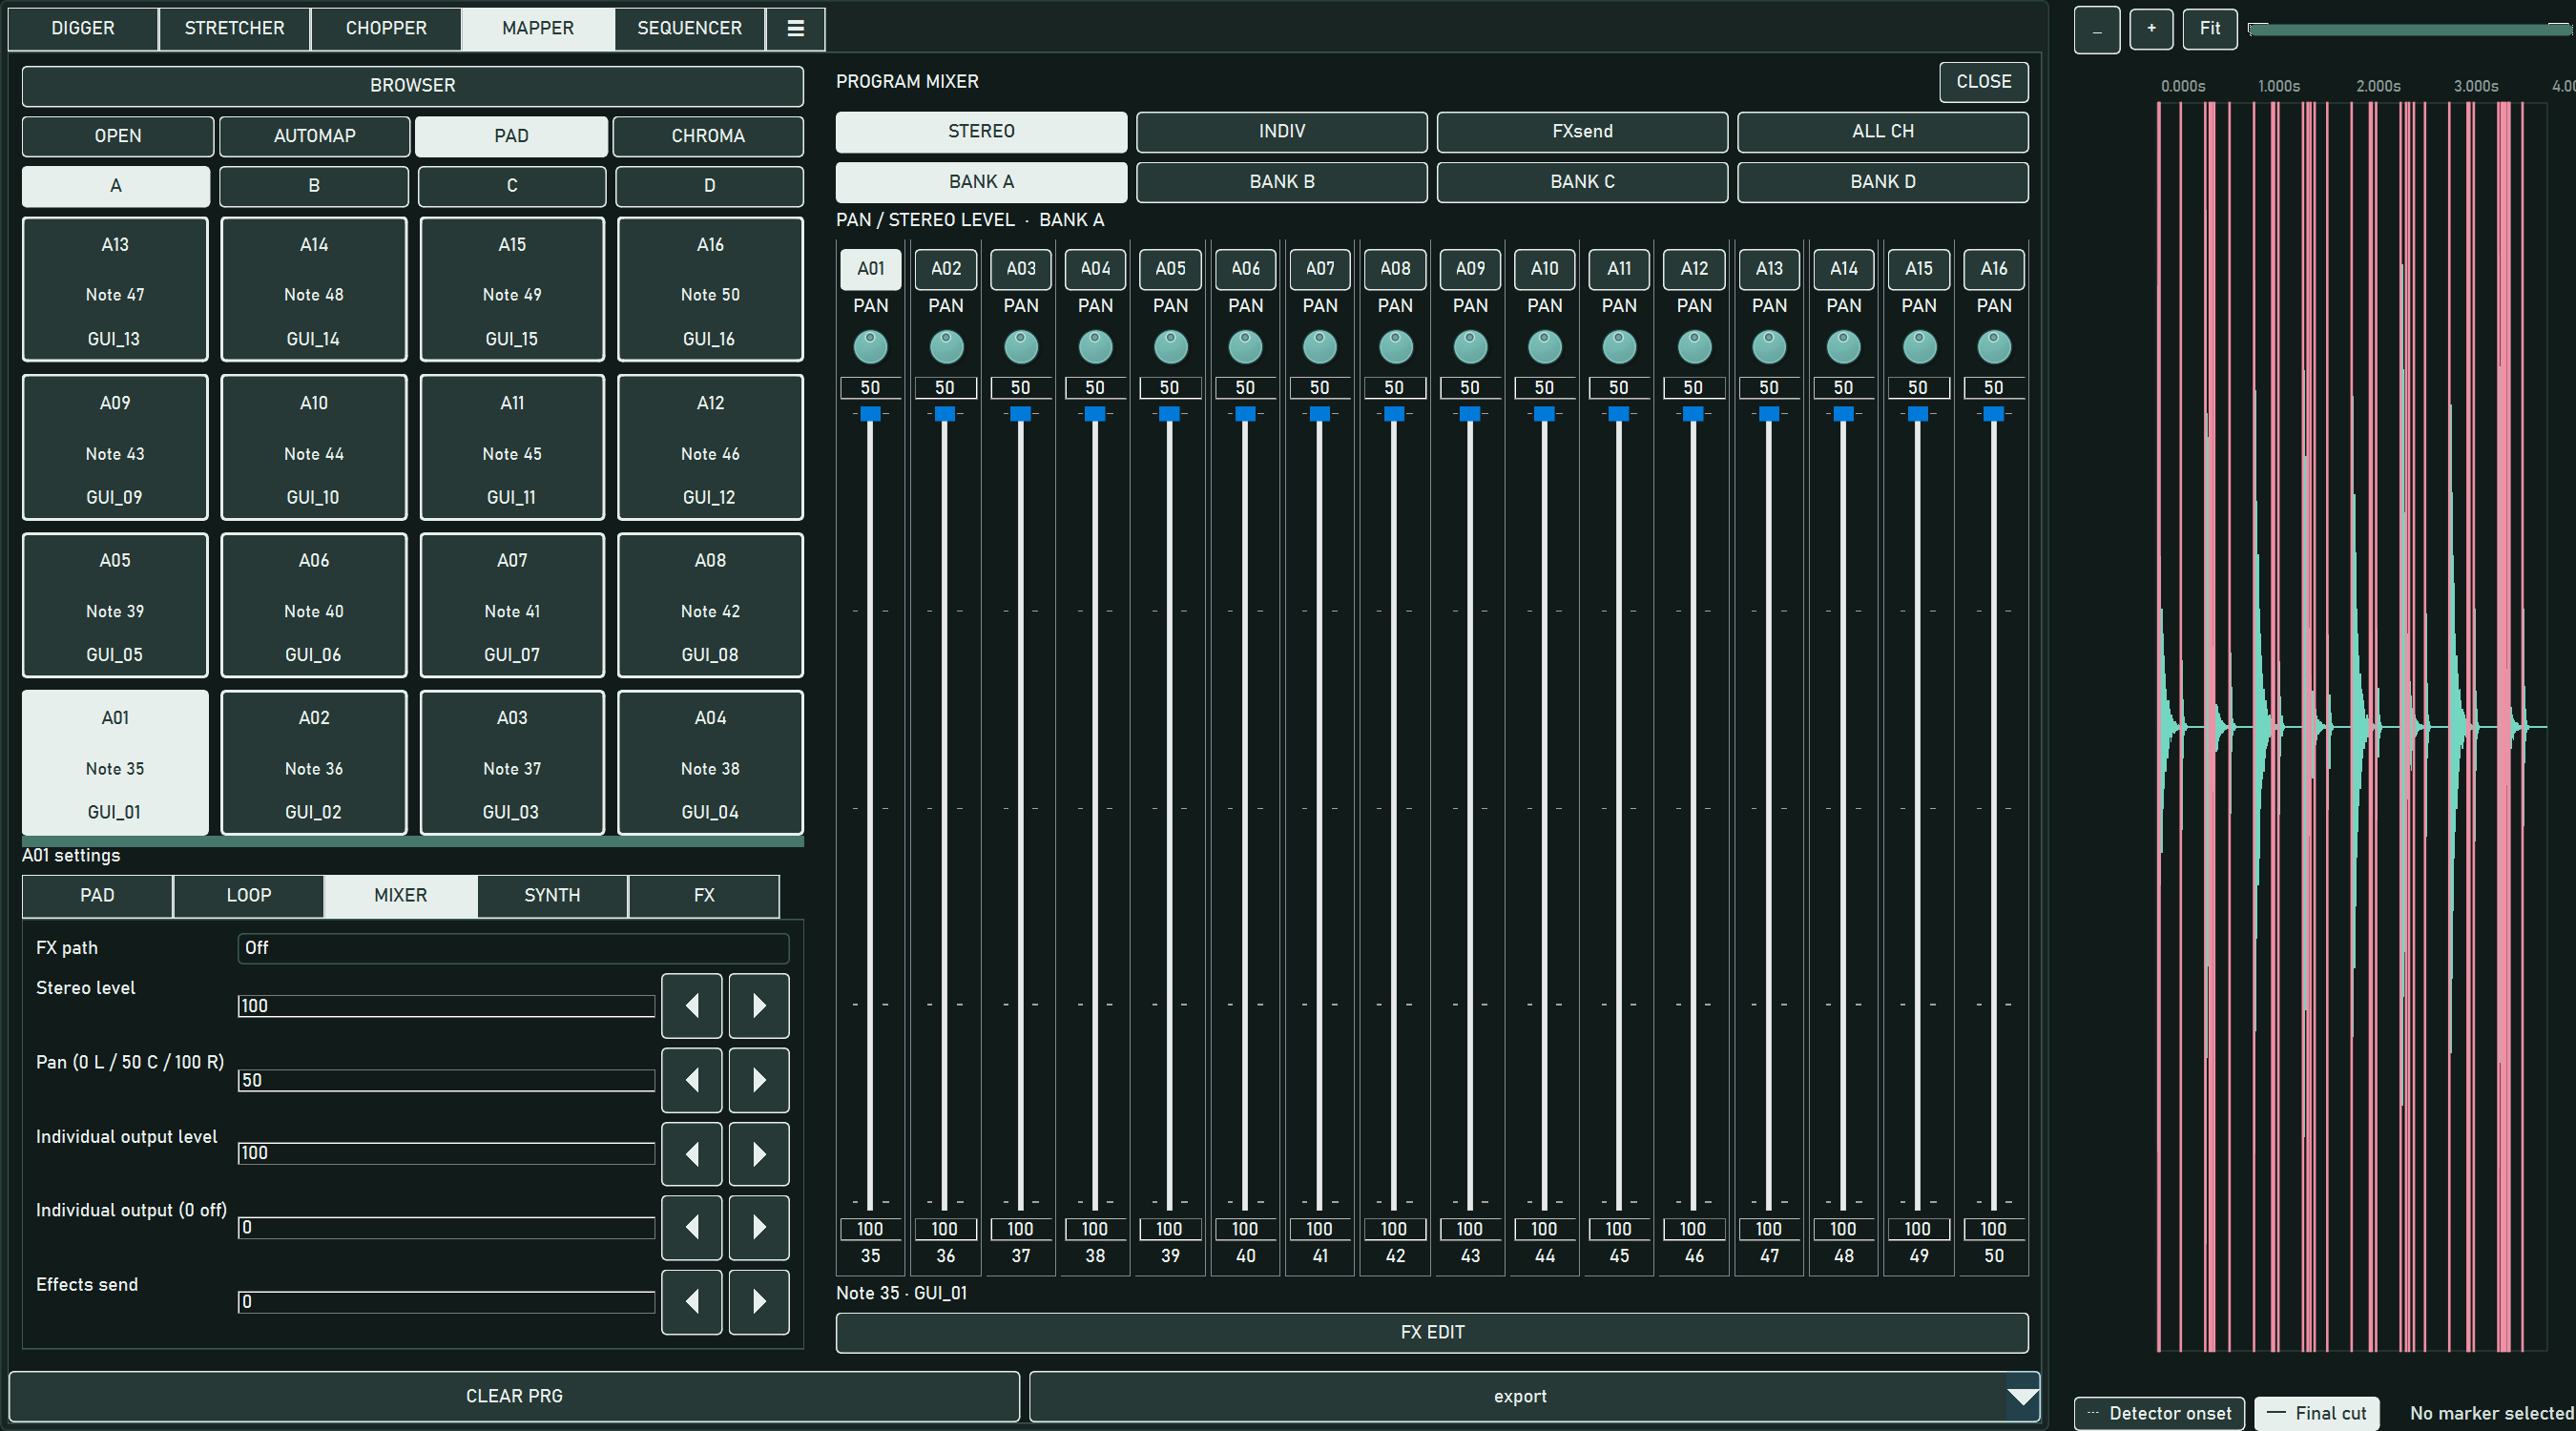
Choose MAPPER's MIXER tab to open the program mixer. Bank buttons change the sixteen displayed strips. STEREO controls pan and stereo level; INDIV controls individual-output assignment and level; FXsend controls effects path and send level.
Enable ALL CH to link changes across the displayed bank; the button becomes CLEAR. Shared note records are adjusted once. Static mixer values are saved in PGM. The current application does not provide APS saving or a native mixer-automation editor.
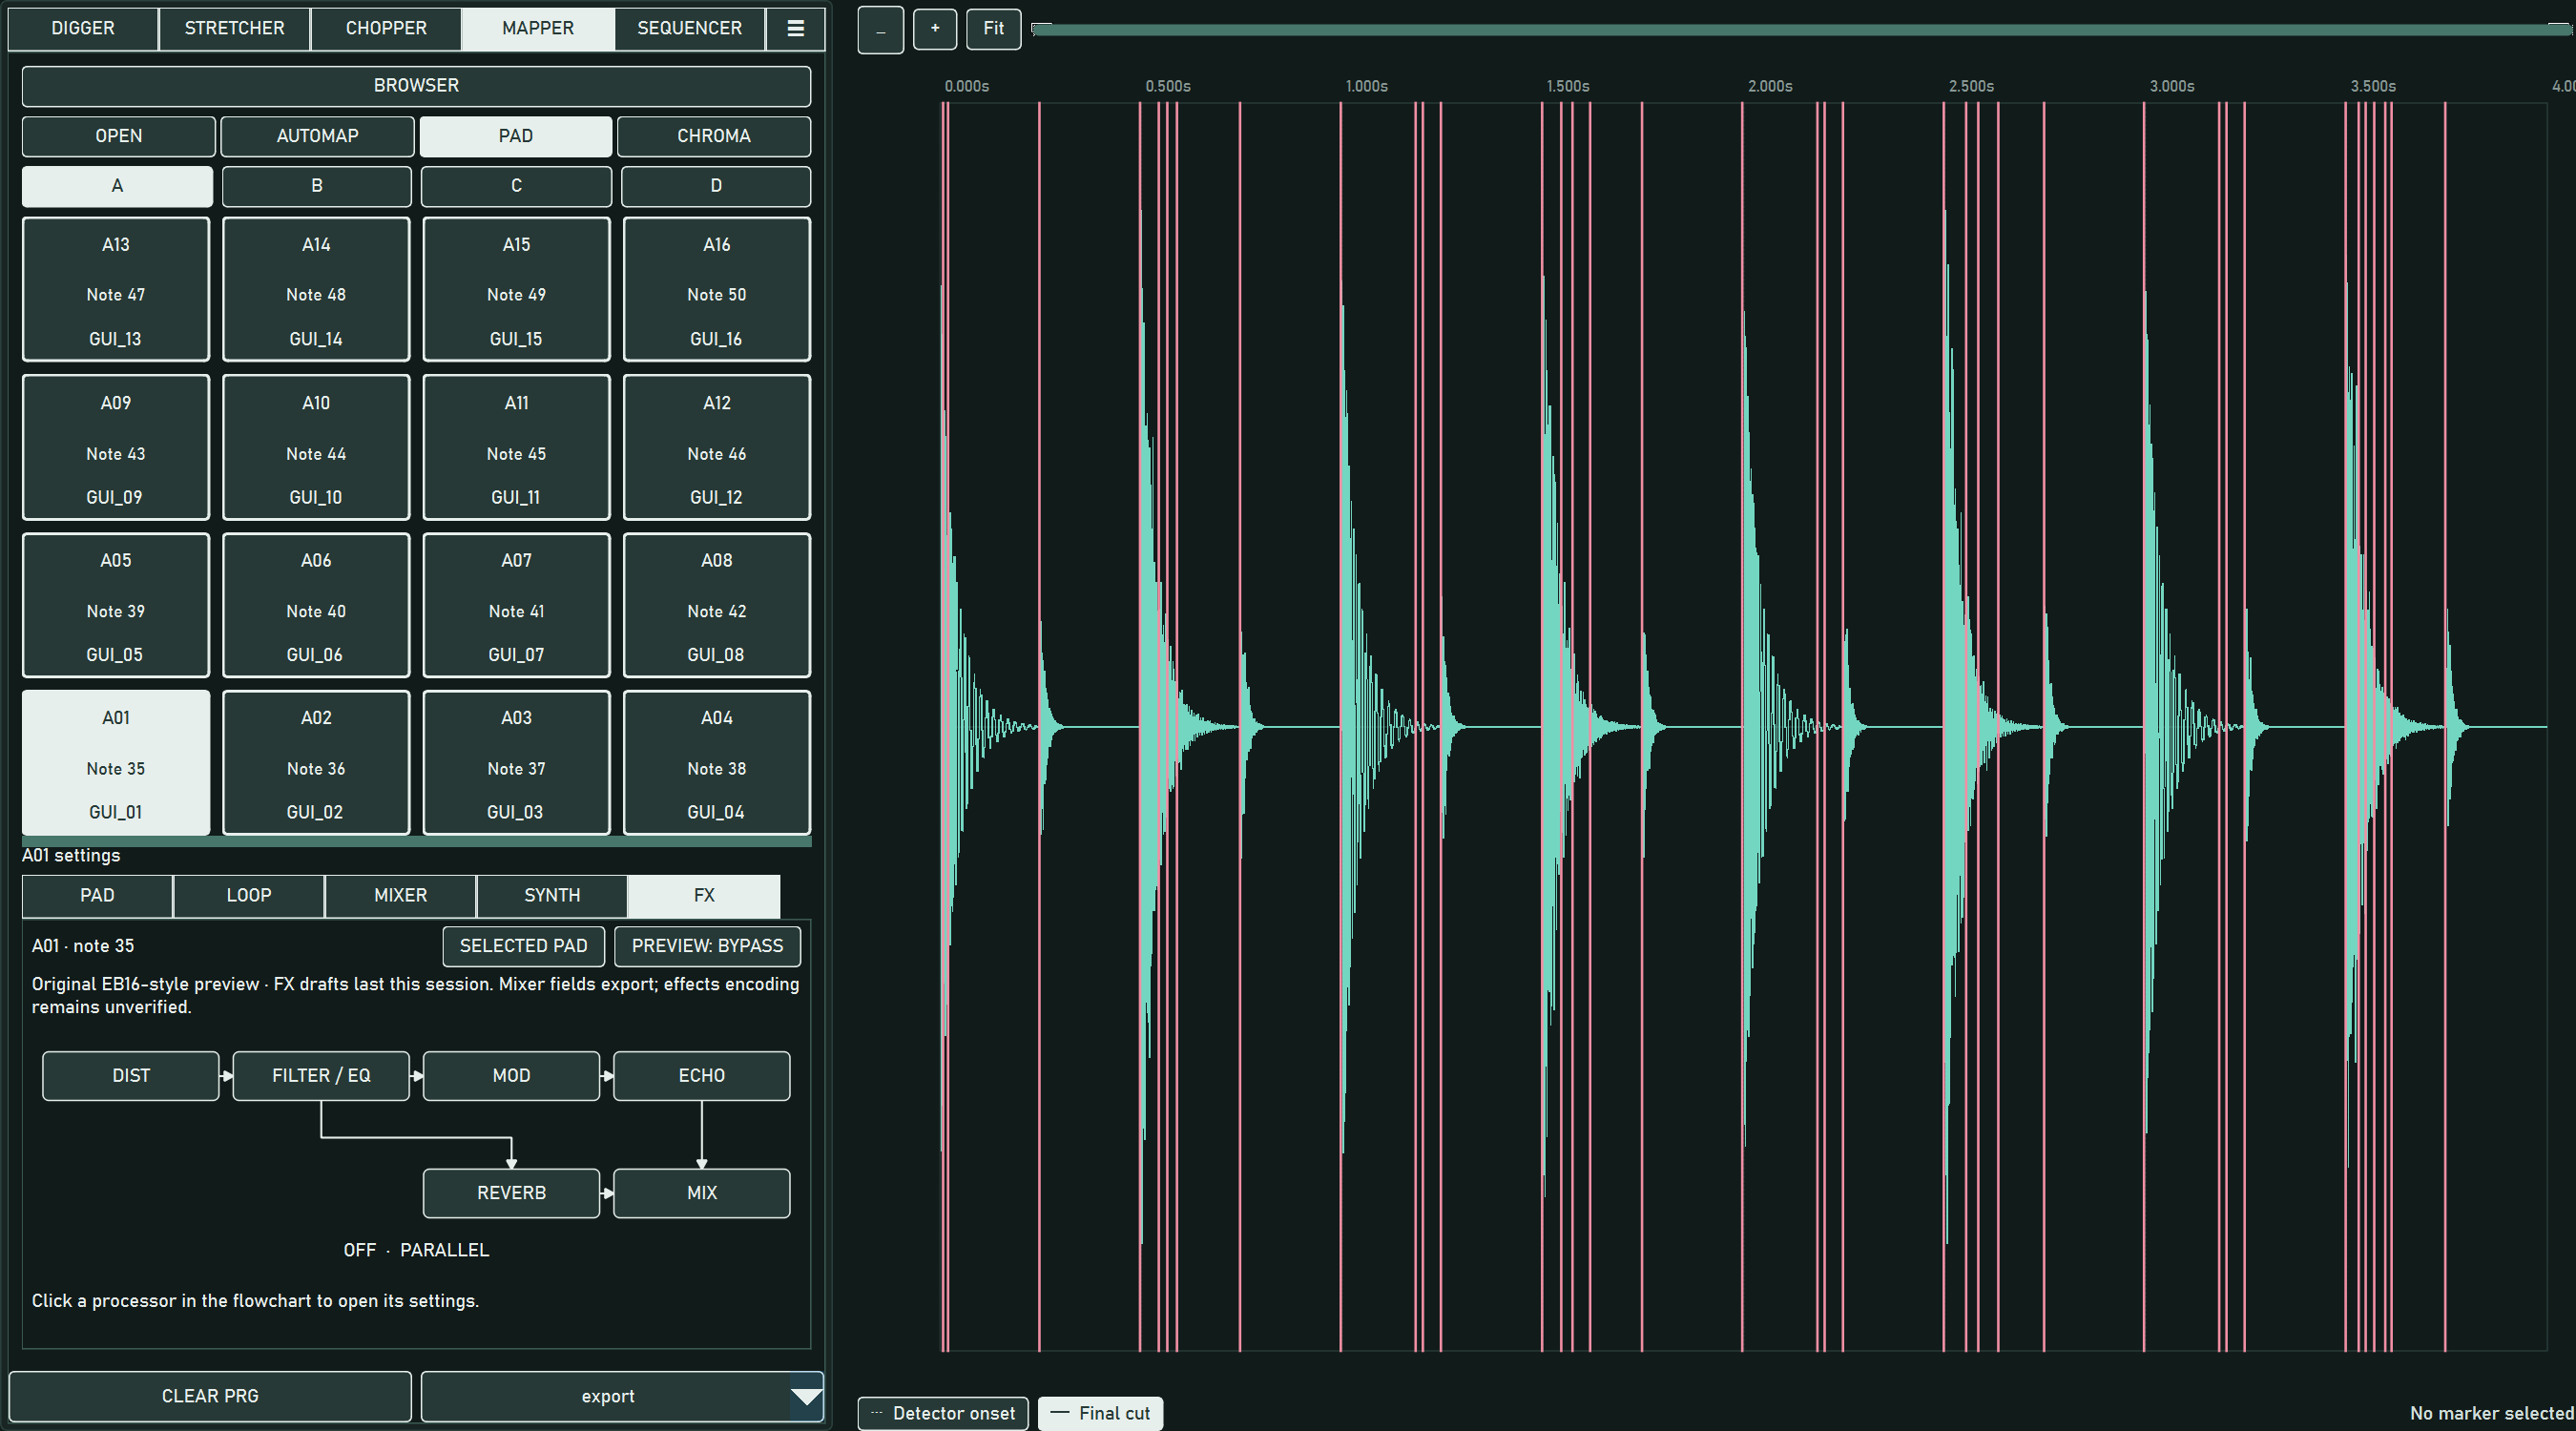
Click FX EDIT or select the FX tab. The routing diagram opens processor detail sections for distortion, filter/EQ, modulation, echo, reverb, and mix. Enable effects preview and adjust the selected pad's draft; use the available all-pad option when appropriate.
FX processor settings affect software preview and are not saved as EB16 hardware effects settings. Static mixer send/path values are saved in the program, and existing imported hardware effects data is retained. Exporting a PGM does not bake the preview filter, envelopes, or effects into every sample.
11 · SYNTH
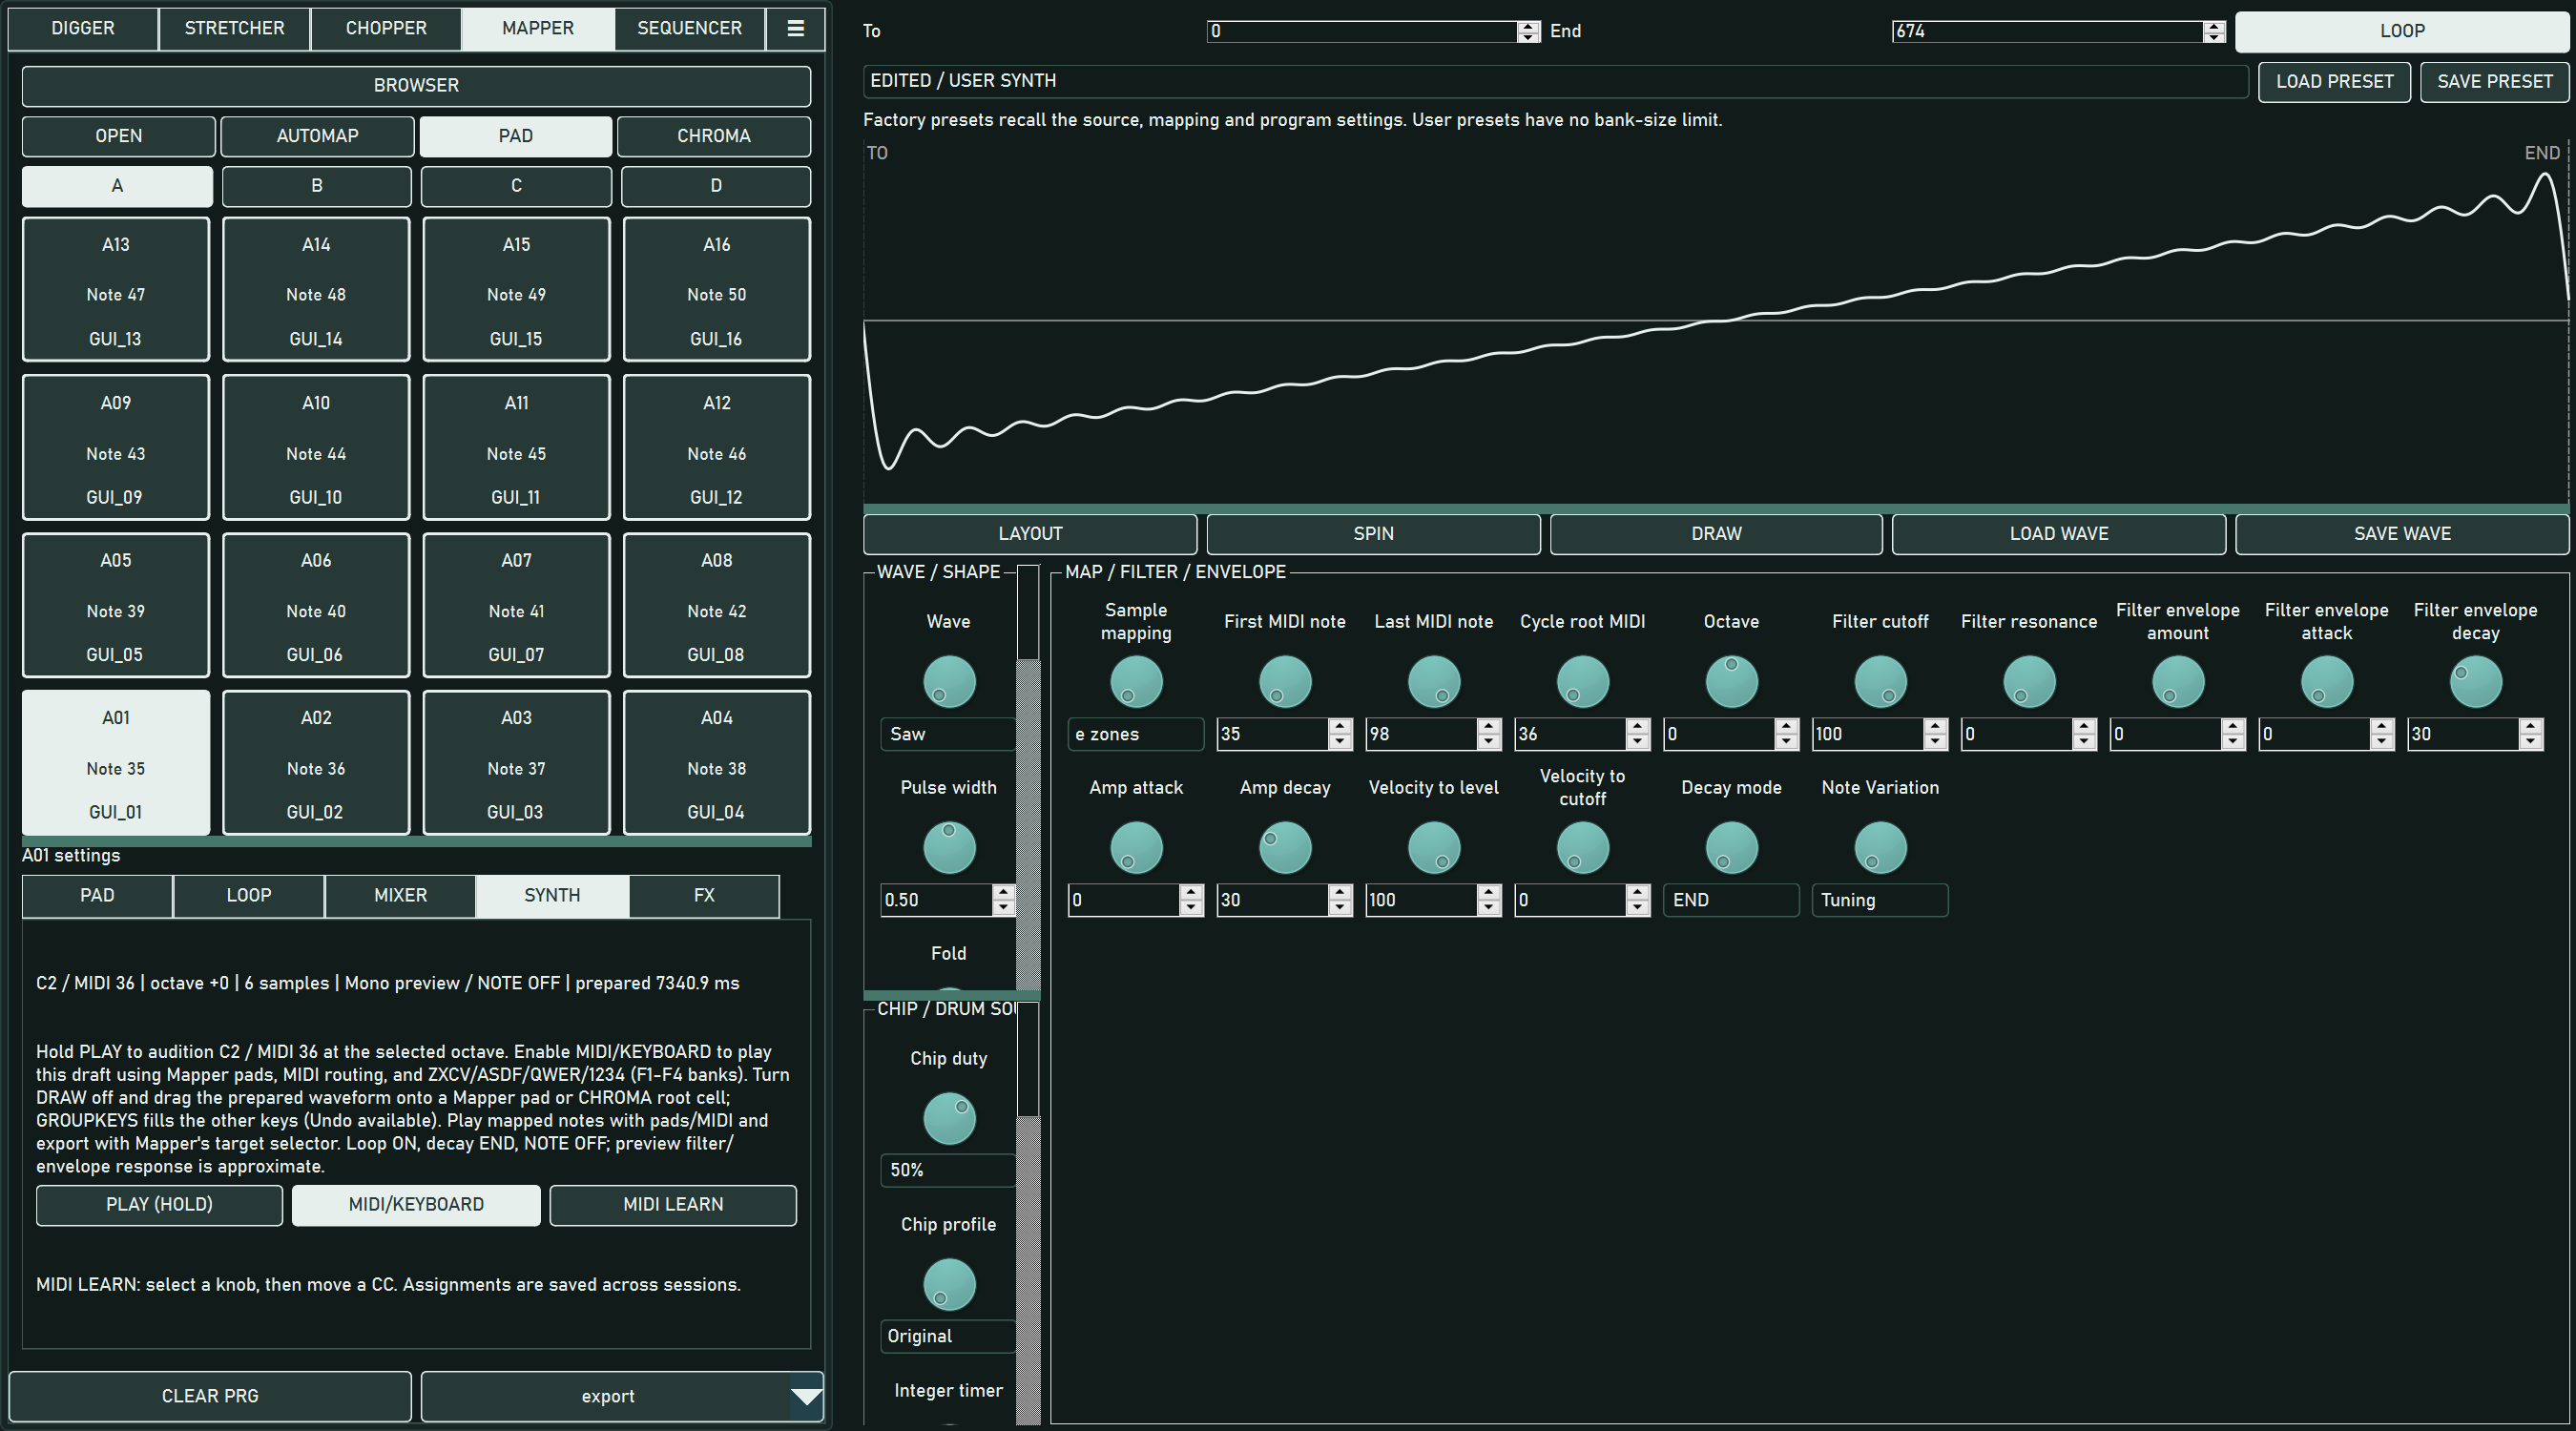
- Choose MAPPER → SYNTH and select a factory preset, named waveform, or LOAD WAVE source.
- Adjust wave/shape controls, chip/drum source, filter, envelopes, range, and mapping. Preparation happens in the background.
- Hold PLAY (HOLD) to audition C2 / MIDI 36 at the chosen octave. Enable MIDI/KEYBOARD to play the draft from MAPPER pads, controller notes, or performance keys.
- Turn DRAW off, then drag the prepared waveform onto a MAPPER pad or CHROMA root. Use GROUPKEYS to fill other keys.
- Save the complete patch with SAVE PRESET; use SAVE WAVE for a single WAV/SND sample or MAPPER export for the mapped program.
SPIN generates a new random harmonic waveform. DRAW lets you draw a custom shape. Pulse width, fold, drive, bias, phase, harmonic count, and falloff shape the source. Loaded samples need an enabled loop for loop shaping. Chip/drum controls include duty, profile, integer timer, variant, source length, drum pitch/sweep, noise/click, and brightness.
Octave zones uses prepared roots across the range; Single wave uses one root wave with relative tuning. First/last MIDI note constrain the mapped range. Octave shifts preview and mapped tuning together. Preview envelope/filter timing approximates the sampler.
The waveform's To/End/LOOP controls edit loop points. LAYOUT allows knob rearrangement and right-click hide/show; hidden settings appear while arranging. Turn LAYOUT off to use the controls normally. Layout is saved in preferences, separate from the musical patch.
MIDI learn
Enable MIDI LEARN, select a knob, then move the controller CC. Turn learn off for normal use. Save/load CC Mapping transfers bindings using .midicc.json. Learned bindings are also remembered in preferences.
Learning and CC edits require a visible, enabled synth control in the active window, with keyboard focus inside its owning synth panel. Click within the panel before moving a controller. Hidden controls and background contexts ignore CC; mappings remain stored when focus changes. Note releases remain available for voice cleanup.
12 · SEQUENCER grid
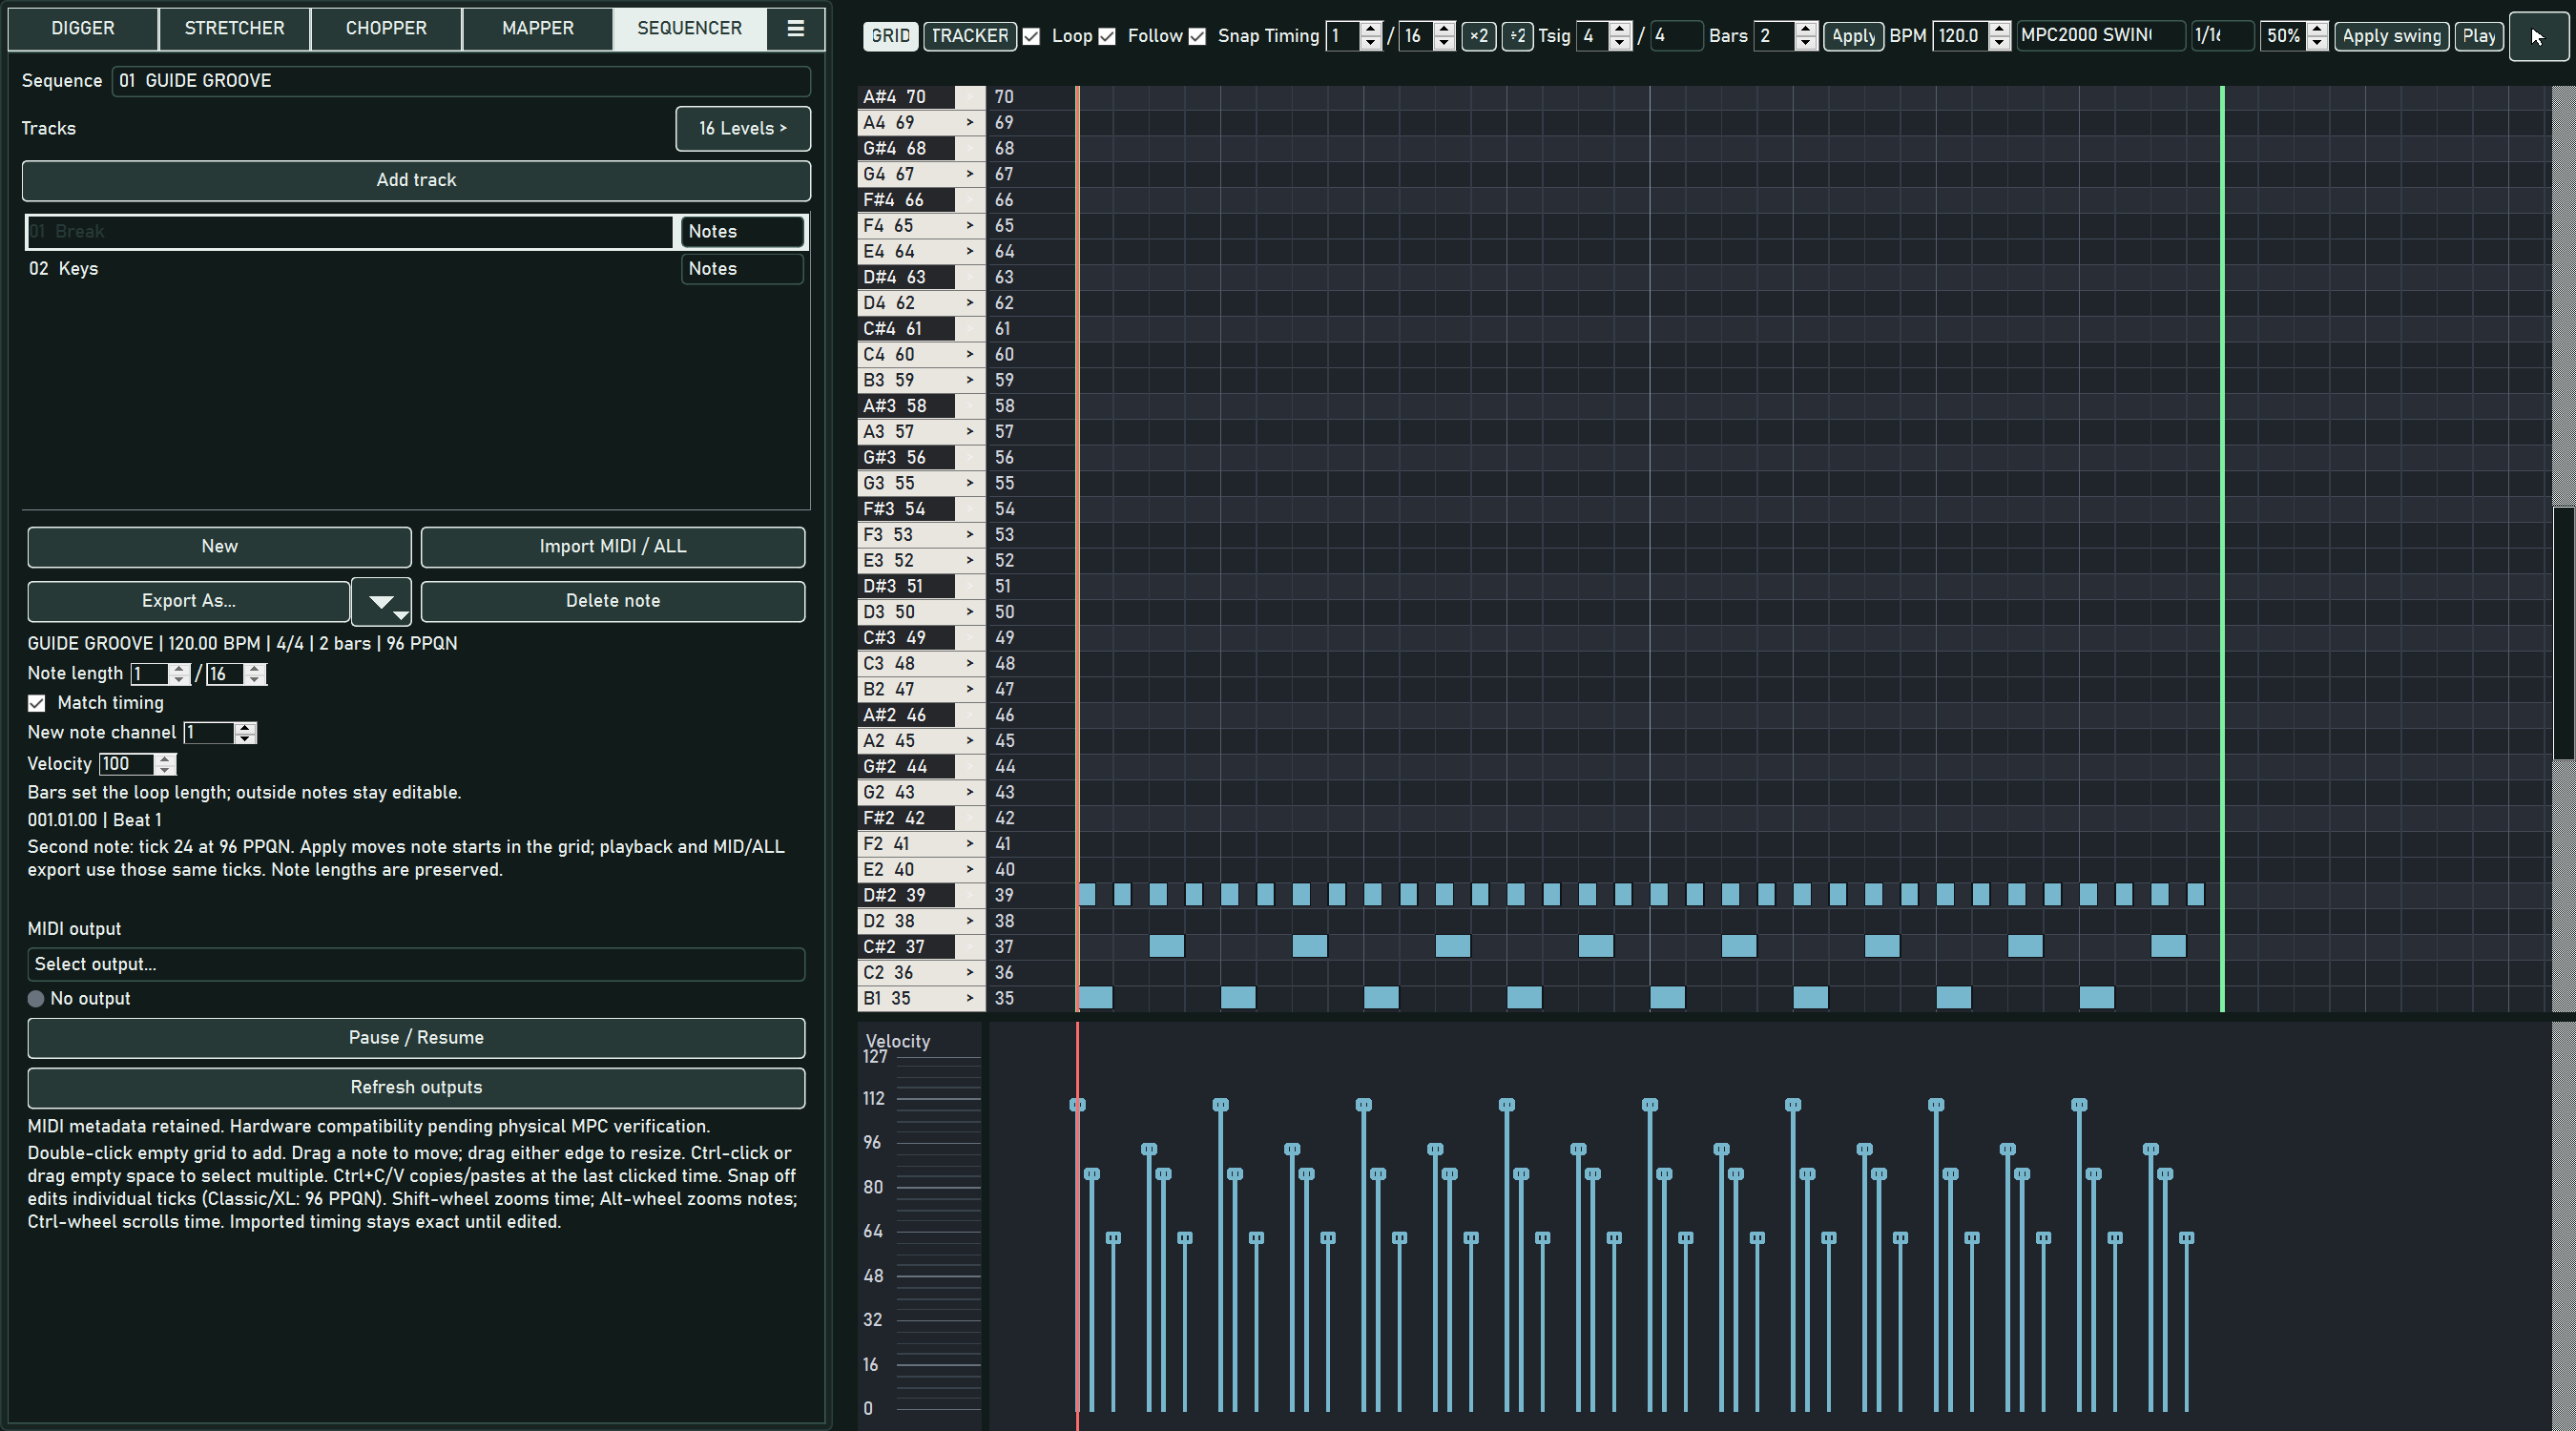
Use New for a blank sequence or Import MIDI / ALL for existing material. An ALL archive can contain several sequences; select one with the Sequence list. Add/select tracks on the left, and use a track's context menu to delete it.
Set Timing as a whole-note fraction: 1/16 is sixteenths, 1/24 is sixteenth-note triplets. Snap aligns edits to the timing grid; turning it off permits individual source ticks. Classic/XL native sequences use 96 ticks per quarter note. Imported off-grid timing stays exact until you edit it.
Match timing makes new notes use the Timing value. Disable it for a separate Note length fraction. Set the new-note channel and velocity before entry. Tsig and Bars choose a bar region; click Apply to commit. Notes outside that region stay editable, but export can truncate them after confirmation.
Draw, select, and transform notes
- Double-click empty grid to add a note. The arrow/pencil tool toggles with the backtick key; pencil supports single-click entry.
- Drag a note to move it; drag either edge to resize. Double-click a note in pencil mode to delete it.
- Ctrl-click notes or drag empty space to select multiple. Ctrl+C/V copy/paste at the last clicked time; Delete removes the selection.
- Adjust the velocity lane beneath the grid. Shift-wheel zooms time, Alt-wheel zooms note height, and Ctrl-wheel scrolls time.
- Right-click for Chord, THEORY, and selected-group Junglize operations. Chord adds a named chord at the anchor/root; Junglize rearranges selected starts. Strict Junglize rejects overlapping placements. Ctrl+M repeats the last math operation.
16 Levels expands the selected track's variation roll; double-clicking its track name also toggles it. Native note-variation data is separate from ordinary velocity. Use the available lanes when editing imported variation events.
Swing offers MPC2000 and MPC3000 timing styles, 1/8 or 1/16 division, and 50–75%. Apply swing time-corrects selected notes, or all notes in the current track when none are selected. It changes start ticks while preserving lengths; both playback and export use the result. A swing setting alone does not apply the operation.
Playback and routing
Select a MIDI output, using Refresh outputs after connecting a device. Select Notes to retain event channels, OFF to disable a track's MIDI output, or a channel on A/B for native routing. Ensure the receiving synth or sampler listens on the correct channel.
Play/Stop, Pause/Resume, Space, and J/K/L control transport. Loop repeats the sequence region; Follow scrolls with playback. Changing GRID/TRACKER does not restart transport. A MIDI file contains note/control data, not the sound of your MAPPER program; sequence export does not render a mixed WAV.
Export As… saves Standard MIDI or a model-specific ALL archive. Use its arrow to select the Classic or XL ALL target. ALL exports the archive's sequences; MIDI exports the current sequence. Classic export warns about XL-specific input and per-track drum/program routing that its format cannot retain.
13 · TRACKER
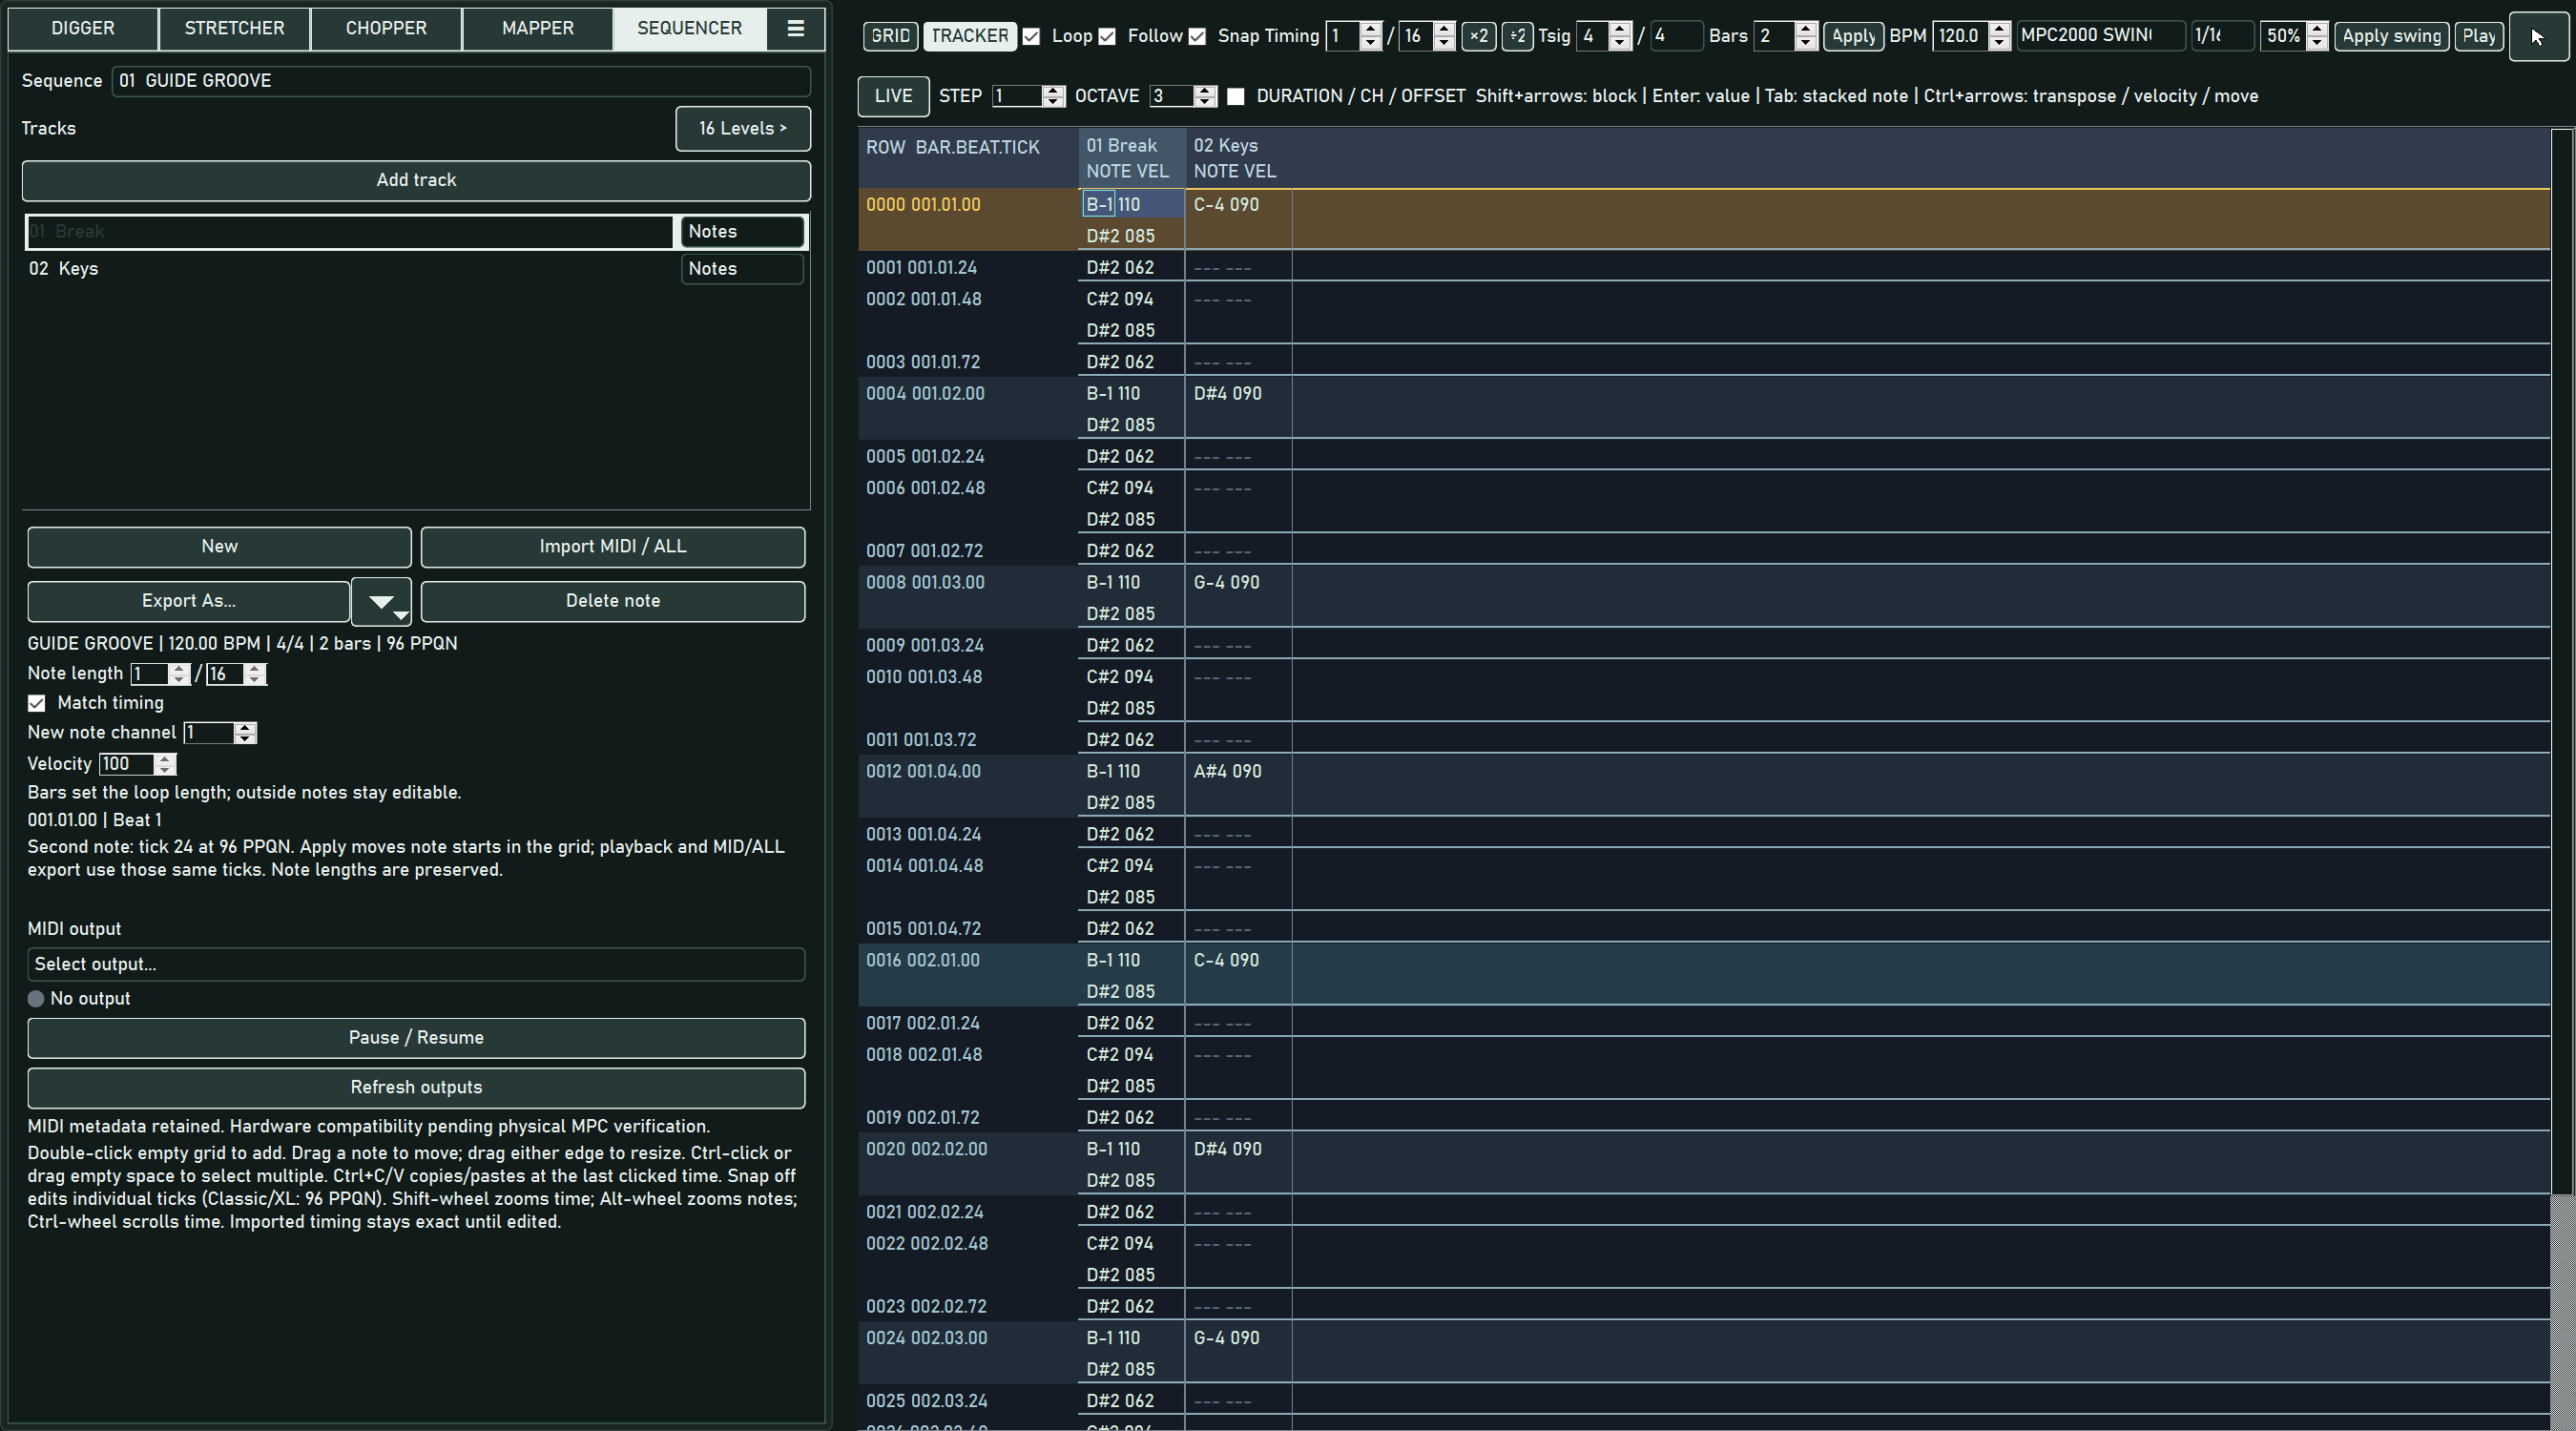
Click TRACKER to edit the same notes in vertical rows and track columns. Timing sets row resolution. Chords and multiple onsets can stack in a cell; click the event or use Tab to cycle. Enable DURATION / CH / OFFSET details to inspect exact values; > marks a start offset from the row boundary.
Arrow keys navigate; Page Up/Down jump sixteen rows; Home/End go to the beginning/end. Shift-navigation or dragging selects a block. Enter edits note/velocity numerically. STEP advances after entry (0 stays in the same cell); OCTAVE sets the lower keyboard row.
The lower computer-piano row is Z S X D C V G B H N M; the upper row is Q 2 W 3 E R 5 T 6 Y 7 U. The upper row plays one octave higher. Existing J/K/L and Space transport keys retain their transport roles.
LIVE starts disabled. Enable it to enter incoming MIDI into the highlighted cell, using the shared input device/channel preference. Entry requires the tracker to be visible, enabled, and focused in the active window. It is cell entry rather than an unrestricted real-time recording mode.
Delete/Backspace remove events. Ctrl+C/X/V copy/cut/paste blocks; Ctrl+A selects the sequence block. Ctrl+Up/Down transpose; Ctrl+Shift+Up/Down change velocity; Ctrl+Left/Right move events by one displayed row. FOLLOW centers the playback row without moving the edit cursor. STEP, OCTAVE, and detail visibility are remembered.
14 · THEORY
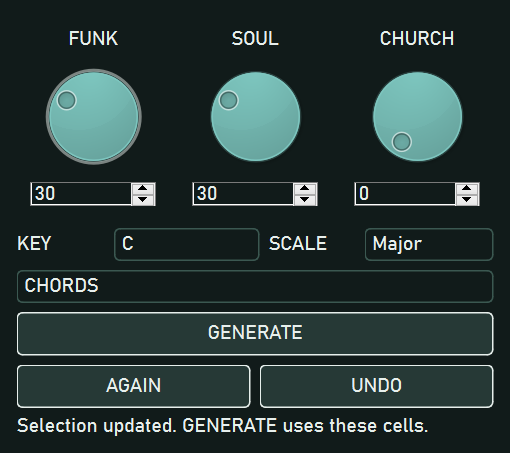
- Select notes in GRID or cells in TRACKER. Right-click and choose THEORY. An empty GRID uses the right-click anchor; TRACKER ranges can include empty cells.
- Choose a key and Major/Minor, then CHORDS or MELODY.
- Adjust FUNK, SOUL, and CHURCH, then click GENERATE.
- Audition through the configured MIDI instrument. AGAIN makes another result using the original selection/source context. UNDO restores the most recent editor action.
FUNK weights rhythmic cells, displacement, articulation, rests, and responses. SOUL weights harmonic colors and chromatic routes. CHURCH weights inversions, bass choice, spacing, retained tones, and contrary movement. The controls interact; listen to the result rather than treating a value as a fixed genre formula.
For selected GRID notes, CHORDS uses the notes' exact onset/duration slots, including gaps and off-grid positions. Empty-cell generation uses a rhythmic grammar. Unselected notes and protected tails remain intact. The window follows new selections.
THEORY supports Major/Minor in 4/4. Imported sequences with compatibility warnings can be read-only. THEORY generates new material rather than identifying and reharmonizing arbitrary source harmony. Its knobs use mouse and keyboard input; MIDI CC learn is unavailable. Save generated notes through the normal MIDI/ALL export.
15 · MIDI and preferences
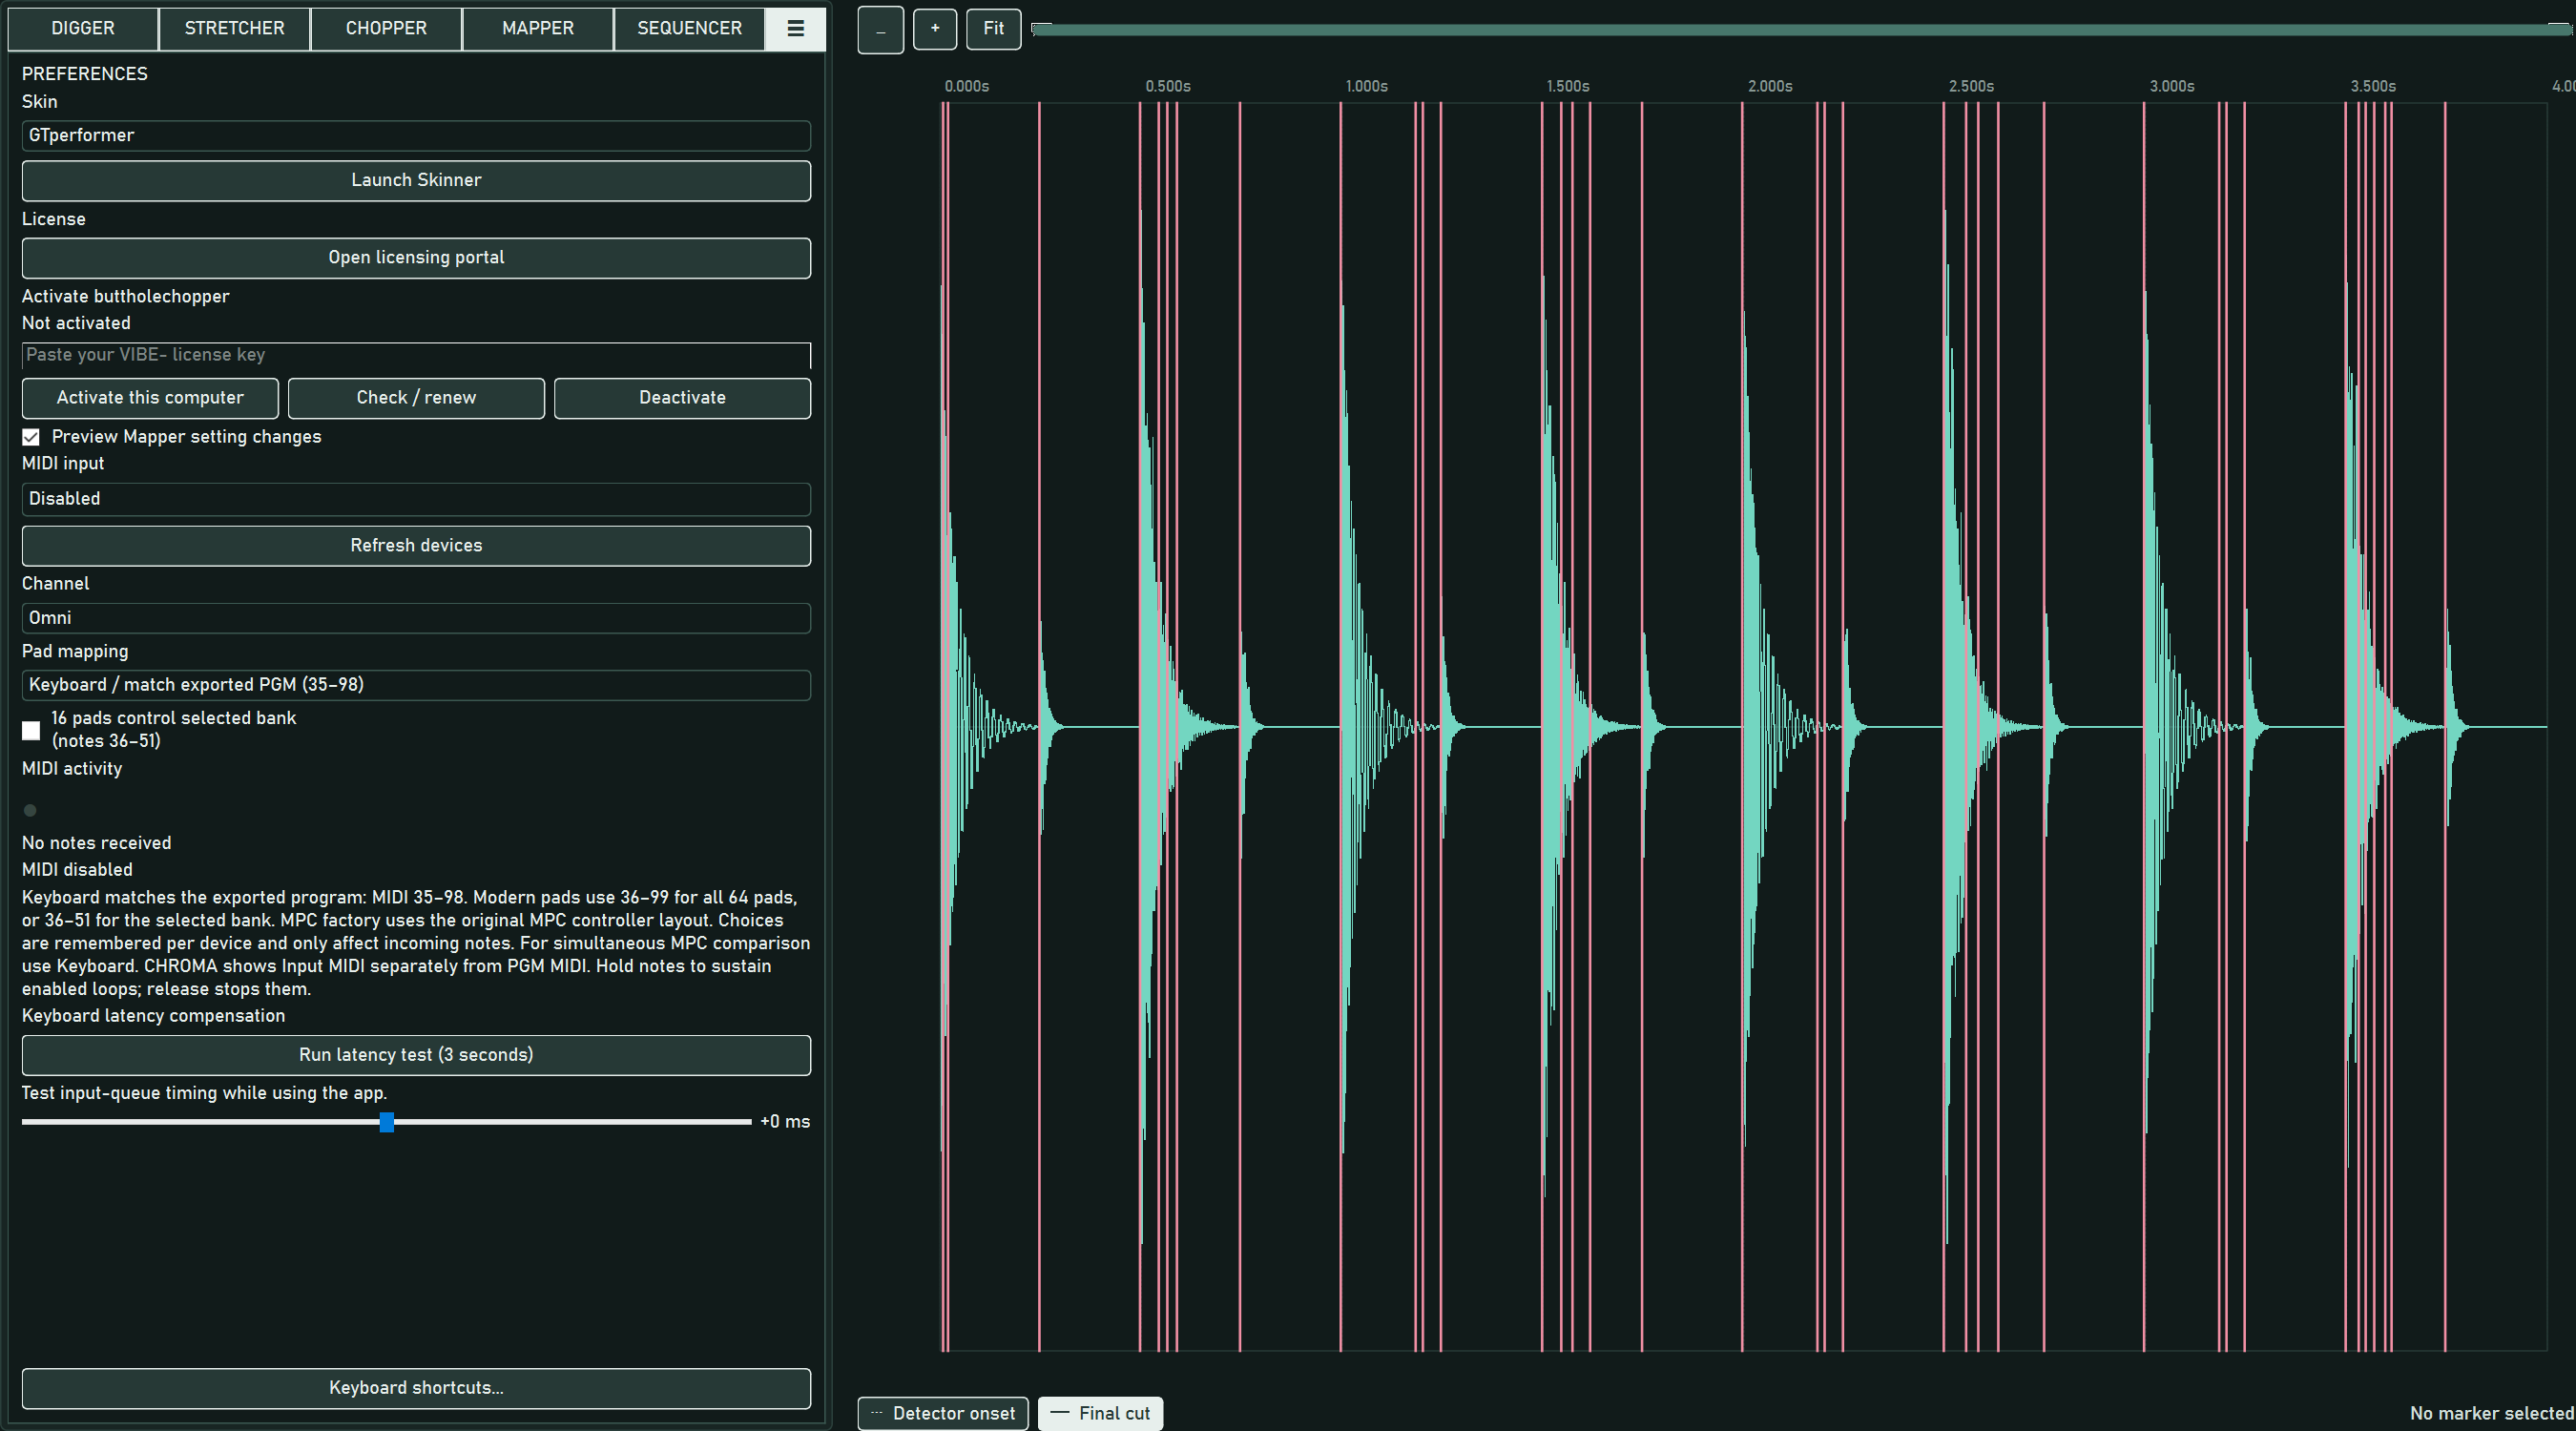
Open ☰, select a MIDI input or Disabled, and choose Omni or channel 1–16. Refresh devices after connecting or reconnecting a controller. Device-specific mapping choices are remembered.
| Input mapping | Incoming notes |
|---|---|
| Keyboard / match exported PGM | 35–98 → A01–D16. Choose this when comparing with hardware driven by the same MIDI notes. |
| Modern pads / starts at 36 | 36–99 → all 64 pads; enable 16 pads control selected bank to use 36–51 for the chosen bank. |
| MPC factory pads | Translates the factory controller layout; A01 receives 37, A02 receives 36. |
The activity indicator flashes for received note messages, including filtered or unmapped notes. The adjacent readout shows note, velocity, and channel. Velocity affects preview gain. Note-on velocity zero is a note-off; releasing notes cleans up gated voices even after routing or bank changes.
Note audition and CC scope are separate. CC control/learn requires its owning panel's focus in the active window; merely leaving a panel visible is insufficient. Hidden tabs, hidden controls, and inactive windows ignore parameter CC edits. Switching away suspends mappings without deleting them.
Keyboard latency compensation adjusts placement of keyboard cuts and I/O points during playback. Positive values place them earlier along travel; negative values later. The three-second latency test measures queued UI-event timing, not physical keyboard-to-speaker latency.
Keyboard shortcuts… customizes waveform/navigation bindings and repeat-math. Clear a field to disable it; duplicate bindings are rejected. Text fields retain normal typing behavior.
License controls
Paste your key in Activate buttholechopper and click Activate this computer. Check / renew updates authorization; Deactivate releases this computer's activation after confirmation. Open licensing portal takes you to the hosted account workflow.
Save/export checks a cached valid license or trial authorization. If no usable authorization exists, the application may contact the licensing service. An expired or invalid trial prompts activation while leaving editing and listening available. Keep your work open while resolving access; closing does not save a session.
16 · SKINNER
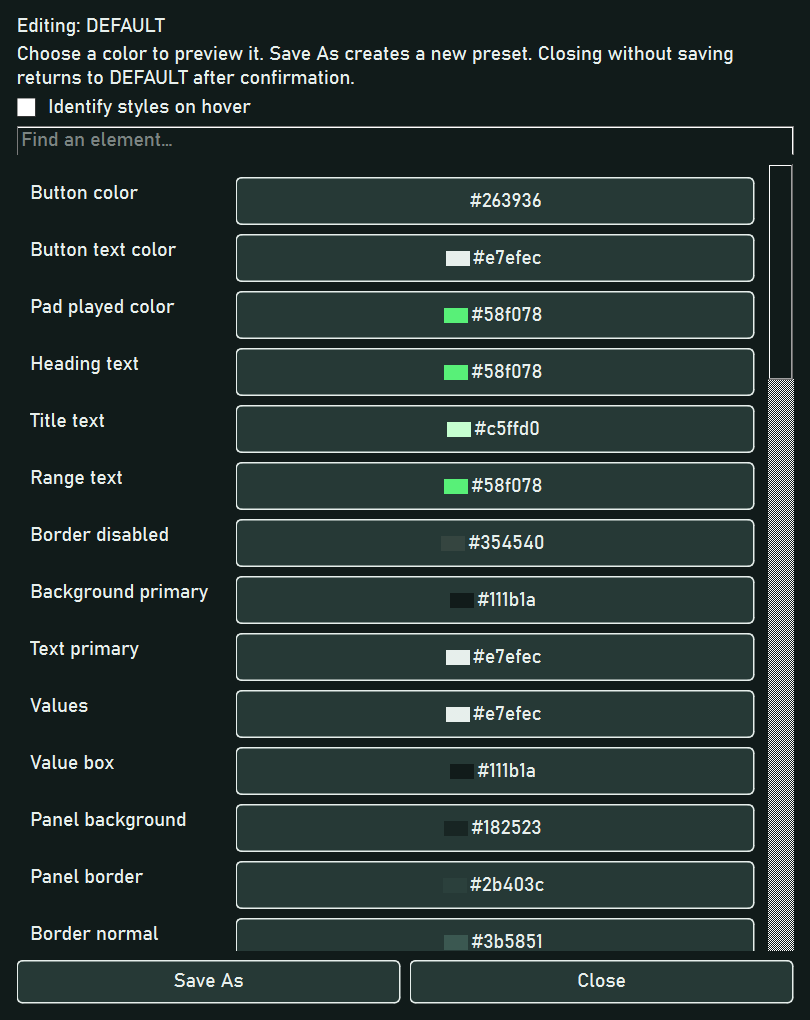
Choose a Skin in preferences to change the application palette. Launch Skinner opens the color editor. Search for an element, click a color swatch, and choose a color or opacity; changes preview immediately. Identify styles on hover helps find the token used by a widget.
Save As creates a named user preset and selects it. Factory skins cannot be overwritten. Closing an unsaved draft offers Save, Discard, or Cancel; Discard returns to DEFAULT. This editor changes colors, rather than rearranging the application or changing its fonts.
Skins are saved in Windows user application settings, not a portable skin file. There is no separate skin file import/export control. Moving or replacing the application folder does not itself delete these preferences.
17 · Save and export formats
Choose the save control for the material you want to preserve. buttholechopper does not have one format containing the entire open session.
| Control | Files written | What is saved |
|---|---|---|
| DIGGER · Export WAV | .wav | The highlighted range, with enabled downbeat rotation; source sample rate and applicable WAV encoding. |
| STRETCHER · Export WAV | .wav | Full current processed waveform; 32-bit float, current sample rate, mono/stereo. |
| CHOPPER · Export reference | .wav + .cuts.json | Full float waveform plus exact final cuts, exclusions, and reference metadata. |
| CHOPPER · Process & Save | WAVs + JSON folder | Click render, individual chops, final/raw timestamps, manual boundaries, detector/settings metadata. |
| MAPPER · export | .PGM + .WAV or .SND | Pad program, samples, encoded note/mixer settings, and supported sample loops. |
| SEQUENCER · Export As… | .mid | Current sequence as Standard MIDI; no sample audio. |
| SEQUENCER · Export As… | .ALL | Classic or XL native sequence archive; separate target formats, no sample bundle. |
| SYNTH · SAVE WAVE | .wav or .snd | A prepared sample with loop metadata; hardware-oriented sample conversion. |
| SYNTH · SAVE PRESET | .synth.json | Complete synth patch including source and musical settings; use this to keep the editable patch. |
| SYNTH · Save CC Mapping | .midicc.json / JSON | Controller-to-synth parameter bindings, separate from the sound preset. |
| SKINNER · Save As | User settings preset | Named color skin; no standalone file is offered. |
MAPPER export presets
| Preset | Sample output | Use and limitations |
|---|---|---|
| MPC2000XL / WAV | New samples: 44.1 kHz, 16-bit PCM WAV | XL program/sample output. Standard preset retains Vu mute-group generation values when used. |
| MPC2000 Classic / SND | New samples: 44.1 kHz, 16-bit SND | Classic-specific sample profile; do not substitute XL WAV assumptions. |
| XL / WAV / Lo-fi 22,050 Hz | 22.05 kHz, 16-bit WAV | Half-rate audio; WAV declares its actual rate. No octave compensation is applied. |
| Classic / SND / Lo-fi 22,050 Hz | Half-rate 16-bit SND audio | Classic playback base uses 44.1 kHz; sample tuning is reduced by 120 to compensate. Additional tuning may spill into PGM within its limits. |
| Backwards compatible / MPC2000XL | Standard XL WAV profile | Converts Vu mute-group generation values to Normal for stock firmware. |
| Backwards compatible / MPC2000 | Standard Classic SND profile | Converts Vu mute-group generation values to Normal for stock firmware. |
Mono/stereo is preserved. Imported unchanged samples may be copied exactly when their format/profile matches; fresh samples and conversions follow the selected hardware profile. Resampling scales trim/loop coordinates. Unsupported metadata conversions are rejected rather than silently discarded.
Keep new hardware names within eight characters using letters, digits, underscores, or hyphens. Export normalizes applicable program/sample names; resolve duplicate sample targets before saving. The current save paths ask before replacing existing files. Keep the PGM beside all its referenced samples and retain the complete folder when transferring to hardware.
PGM settings describe playback rather than baking preview processing into samples. Software FX drafts, MIDI input translations, and Mapmax display annotations are not a complete hardware state. APS export is unavailable. Sequence MIDI/ALL exports do not contain the PGM or sample audio.
Formats that are not save targets
MP3, FLAC, AIFF, Ogg, and other accepted import containers are not general audio-export choices in this UI. There is no complete-session project format, APS save, tracker module export (MOD/XM/IT), or sequencer audio mixdown. Convert exported WAV externally if you need a delivery format the application does not offer.
18 · What survives closing
| Material | Before you close |
|---|---|
| Current chopped/stretched break | Export full WAV and, if cuts matter, a reference WAV/JSON pair or listening-artifact folder. These are not a complete reopenable session. |
| Mapped sampler instrument | Export PGM with all WAV/SND samples. OPEN reloads the saved program and samples. |
| Sequences and THEORY results | Export MIDI for the current sequence or ALL for the sequence archive; import it next time. |
| Editable synth draft | Save a synth preset. Saving only a wave retains the sample, not the full synthesis recipe. |
| FX preview drafts, Mapmax annotations, undo | These have no full-session save. Record settings you need separately; do not expect PGM to restore them. |
| Preferences and saved user skins | Remembered automatically where supported. They are configuration, not your musical session. |
The application keeps working audio separately from your final exports. Export dialogs let you choose where to save. Keep final exports in a named project folder; temporary working audio alone is not a session backup.
A practical folder contains the processed break WAV, cut reference pair, PGM and all samples, sequence MIDI/ALL, synth preset, and optional CC mapping. Save both a hardware-ready copy and any editable source material you need.
19 · Keyboard reference
These are defaults. Preferences can change the waveform bindings; active workspace and keyboard focus determine the action. Text fields retain their normal editing keys.
| Key | Action/context |
|---|---|
| Ctrl+Z | Undo the latest editor action; one level, no redo. |
| Space | Workspace transport: DIGGER play/loop behavior; STRETCHER play/stop; sequencer play/pause; MAPPER browser play/stop when open. |
| J / K / L | Reverse / pause / forward transport; sequencer shuttle/pause. |
| I / O | Set in/out endpoints from playback where supported; I records a CHOPPER cut. |
| H / ; | DIGGER jump to inpoint/outpoint. |
| + / − | Double/halve waveform zoom. |
| Left / Right | Jog the selected range endpoint or select the previous/next chop. |
| Delete | CHOPPER selected marker: remove boundary; selected chop: toggle exclusion. Sequencer: delete selected notes. |
| F1 / F2 / F3 / F4 | CHOPPER/MAPPER banks A/B/C/D. |
| ZXCV / ASDF / QWER / 1234 | CHOPPER/MAPPER sixteen pads, rows bottom to top. |
| Backtick (`) | SEQUENCER arrow/pencil tool. |
| Ctrl+A / Ctrl+C / Ctrl+V | SEQUENCER select all / copy / paste at anchor; TRACKER block equivalents. |
| Ctrl+X | TRACKER cut selected block. |
| Ctrl+M | SEQUENCER repeat last math operation. |
| Shift-wheel / Alt-wheel / Ctrl-wheel | SEQUENCER time zoom / note-height zoom / time scroll. |
| Middle mouse drag | Pan a zoomed audio waveform horizontally. |
20 · Troubleshooting
| Problem | Check |
|---|---|
| No audio from sequence playback | Select a MIDI output and receiving instrument; check track channel/OFF routing. Sequence transport sends MIDI, not an internal mixed sample render. |
| MIDI indicator flashes but no pad plays | Check channel filter, input mapping, selected-bank option, note range, and whether the target pad has a sample. The activity light also shows filtered notes. |
| CC or MIDI learn appears inactive | Click inside the owning synth/effects panel. Ensure the control is visible/enabled and its window is active. Check the binding's CC/channel; hidden/background contexts deliberately ignore edits. |
| Chop is missing from AUTOMAP | Check the first final cut, red exclusions, and the 64-pad limit. Material before the first cut is skipped. |
| Moved cuts do not change an assigned pad | The pad stores a captured snapshot. Reassign the chop or rerun AUTOMAP, which replaces the program. |
| Cut mode change removed edits | Changing Transient/Interval clears cut state. Use the single available Undo immediately; retain reference exports for important edits. |
| Bad stretch tempo | Enter beats for the whole loaded waveform. Remove excess silence in DIGGER first. Check time mode, compound processing, and whether Varispeed intentionally links pitch. |
| Clicks at loop seams | Listen while refining To/End or try AUTODETECT on a stable tone. The preview engine does not add automatic seam fades. |
| Program fails to open or transfer | Keep its samples beside the PGM. Check missing/duplicate files, legal names, target model, and firmware-compatible preset. Classic and XL sequence/sample formats require separate handling. |
| Export rejects a conversion | Check sample metadata/tuning limits and names. Use a compatible SND profile when WAV conversion would discard SND metadata. |
| Save/export asks for activation | Open preferences, activate or renew valid access, and retry. Keep the session open while resolving the authorization. |
| Controls look compressed | Maximize the window, narrow the left panel, collapse MAPPER BROWSER, or resize a splitter. Scroll within settings for controls below the visible area. |